|
 
Copyright © 1995 Mike James, Azimuth Design.
The Angelissa character, in whole or in part, likenesses thereof,
storyline, costume and all related materials are copyrighted
and registered intellectual property of Azimuth Design.
All rights reserved, in any media.
Click on any
picture for a
Close-Up view. |  |  |
Comic Book (This
comic book is no longer available.)
Congradulations to all of you who own this wonderful
24 page Angelissa comic. This ash can edition was hand
written, hand drawn and hand printed by Mike James. To find out
more read The Legend of Angelissa
or click on one of the sample pages below to see a closeup.
|
Kit Instructions
Parts Check
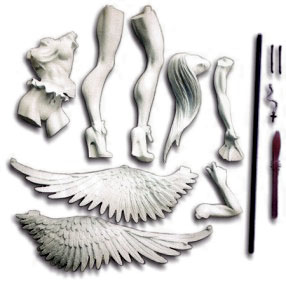
- torso
- head
- right wing
- left wing
- right arm (bent)
- left arm
- right leg (R. on leg)
- left leg
- steel rod
- clear (pink) orb
- tiny metal cross
Step 1.
First clean all parts with warm soapy water. A mold release
was used in casting and our little angel needs a good bath. Scrub
her good.
Step 2.
Before you try to assemble the kit, you should remove all the
cylindrical sprue ends. Also remove the little casting "fins"
around the skirt, over the big bow, around the fingers, and at
the bottom of the shoes. CAUTION! Do NOT remove
the two rectangular extrusions at the base of the wings! These
fit into the rectagular holes in Angelissa's back and give much
needed strength to that connection.
Step 3.
This is also a good time to VERY CARFULLY drill out
the cavity in her clenched hand that holds her scepter. The diameter
bit to use is 3/1 6ths, the same as staff diameter and no bigger.
It should be a tight fit when you slide the rod through her hand.
If you are worried about adjusting position of staff you can heat
her arm or wrist to make final adjustments.
Step 4.
It's also a good idea to do as much mold-searn sanding and
filing as you can before you begin assembly. Those hard-to-get-at
areas are gonna' be just about impossible-to-get-at once assembled.
Step 5.
Test fit and glue up the WHITE RESIN pieces including
the wings. Use Zap-A-Gap, Crazy Glue, or any quick-bonding cyanoacrylate
glue. Do NOT yet glue in the metal rod or the clear pink
scepter top. They REALLY get in the way when puttying and
sanding the seams.
Step 6.
Right now Angelissa is too back-heavy to stand because of her
wings, but once the staff is added she will stand as sturdy as
a rock. That's because the metal staff will give her a TRIPOD
effect. Her two feet and the bottom of the staff should make an
almost EQUILATERAL TRIANGLE so that her center of gravity,
with wings, should fall between these three points. It may be
necessary to heat her arm and wrist in hot water and bend a bit
to get the staff to angle right. If so, do this now.
Then slide the metal rod into her hand, UNGLUED, and
place her on a KNOWN flat, level surface. Feel her weight
as you tilt her forwards and backwards letting the rod slide through
her fingers. When she feels balanced, mark where the rod exits
her hand (top finger). Slide out rod and cut it at that point
(hacksaw). Then slide it back in, rebalance her and glue the rod
into her hand. Some final heating and arm bending will correct
any minor positioning. When you're done with this step, she should
stand very sturdy.
Step 7.
Stiletto heels that never break? "Impossible!", you
say. It's radical, but it's easy. First find two #4 finishing
nails. Now for the hard part. Grit your teeth and snap about a
half inch off her heels. You don't have to be accurate but save
the pieces. Finding a drill bit the same diameter as the nails,
drill up into the thick part of her heel at least a half inch,
at the same angle the former heel was. Push the nail into the
hole until it stops. Then lay your broken heel up against the
nail (while the nail is still inserted) and mark where the resin
heel ends. Measure carefully what is REMAINING on the nail,
and cut THAT MUCH off the pointy end of the nail. Then,
when you slide it back in, it should be the same length as the
original heel. If so, glue it in, and use a little putty to blend
the nail into the resin heel. Voila! Virtual Kryptonite!
Step 8.
A snazzy way to get her feet to sit extra-flat is to Vaseline
a piece of glass or formica. Then dab a tiny bit of putty onto
the soles of Angelissa's cute little pumps and press her feet
into the vaselined glass until it sets. Actually, you can use
a razor blade to trim off the putty squirting out the sides while
putty is still buttery. Once set, just slide off. The putty will
not stick to the greased surface.
Step 9.
The orb at the top of Angelissa's scepter requires some special
attention. (First of all, do not be confused that the entire top
part of the scepter is clear cast even though the only part necessary
to be clear is the oval orb at the very top. When painting, simply
paint everything below the orb to match the metal part of the
staff.) The orb itself should be sanded with NOTHING coarser
than 320 grit sandpaper and be worked down to 600 GRIT
at least. When that is done, Brasso or any silver polish can be
used to buff the surface to a near glossy finish. At this point
the orb will be almost perfectly clear and the tiny bubbles inside
will be visible. Rub off the silver cleaner residue with soapy
water, towel dry (not blow dry) really well. Finally, spray a
clear GLOSS lacquer like Krylon Crystal Clear (excellent)
and make the orb look like GLASS!
Step 10.
The tiny silver cross is optional. Save attaching it until
Angelissa is completely painted. At that time simply dab a teensy
bit of glue to the end of the chain and attach it where the little
ruffled skirt meets her hip (centered under the bow). She'll kiss
you for it later.
Painting Tips
Painting smooth flesh
Sometimes airbrushed paints give a toothy surface build up
especially on light flesh when several coats are needed to cover
dark primer. Try dabbing on the final flesh coat a section at
a time with a Q-tip and RUBBING IT IN with your finger.
This will knock down the grainy tooth and fill the depressions
at the same time. It will render a surface that is almost glassy
smooth. Final detail airbrushing will go on great, and a finish
or protector coat of a lacquer DULL COAT gives the proper
sheen.
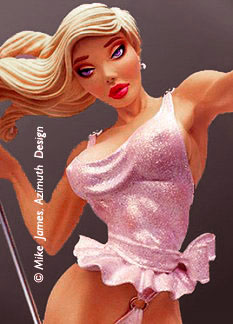
Surfaces
As expert painters of models will tell you, contrasting surfaces
can add a lot of realism to your model. Angelissa provides an
excellent opportunity to exploit surface contrast. Her skin should
be dull-coated to a satin finish. Her costume (silverleafed in
the photo), and her eyes, and lips can be made glassy with clear
gloss varnishes.
If you do not wish to silverleaf her costume (actually a fairly
easy process costing only a few dollars) we suggest painting her
outfit with Liquitex IRRIDESCENT WHITE or PEARL WHITE.
The sparked effect gives her a fairy quality, and looks really
FANTASTIC! Try it, this color is a best-kept secret.
Wings
Spray a thin, but opaque coat of white over all. Spray a coat
of dull varnish to seal. Mix a thin wash of pinkish-gray with
a little bit of airbrush cleaner or a tiny amount of Windex and
brush over each surface so that the darker color flows into the
crevices of the feathers. Mist all with Liquitex IRRIDESCENT
WHITE. Gently blend a soft transition area where her flesh-colored
back becomes the white wings. Coat all with dull varnish.
Extra details
Angelissa likes to look dressy when she goes out. Go to a sewing
notions store, a doll store, a Woolworth's, or some place where
they have cheap costume jewelry you can get for a buck. (You "el'
cheapo" guys know what we're talking about.) There you can
find scaled-down little glass beads, diamonds, or pearls on a
thread, that can be dangled around Angelissa's delicate neck,
or seperate pearls to attach to her ears. These places are treasure
troves of miniture do-dads. It's where we found her little cross.
However you decide to adorn her, believe us, she will make it
worth your while.
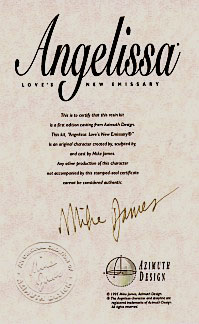
We have had a lot of illegal knock-offs of our
kits sold in foreign countries.
Remember, Azimuth Design only sells directly to
the customer, not in stores. If your kit does not include
the Certificate of Authenticity below, with the
Raised Seal and personally-inked signature
of Mike James,
you do not own a Mike James original piece of art.
It takes a lot of time, skill and money to bring you these precious
girls. Please support creators, not thieves.
Contact us if you suspect illegal activity, or if you see a Mike
James kit or image being used for profit.
Copyright © 1995 Mike James, Azimuth Design
The Angelissa character, likenesses thereof, storyline and all related materials are copyrighted
and registered intellectual property of Azimuth Design. All rights reserved, in any media.