|
 |
We do a lot of the kit cleaning for you, before we put the kit in the box, so this shouldn't take long. Grind off any remaining casting sprue nubs, any residual "finning" you may see. Inspect the resin parts carefully. Putty and sand any pinholes you may find on the figure parts. When you have most of these visible imperfections taken care of, it's time to degrease the kit of mold release agent (otherwise paint won't stick). We recommend a thorough scrubbing of all resin parts with either rubbing alcohol or lacquer thinner. Or even just body-temperature water (NOT hot water!) and dish detergent. Get into all crevices.
![]() Assembly
Assembly
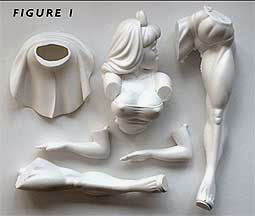
The first thing we're going to do is TEST FIT the arms to the upper torso because understanding correct placement is critical. You'll notice little inscribed witness marks at the sides, near the flats of each arm.There are corresponding witness marks on the torso parts. Line them up making sure the thumbs are next to each other. DON'T glue them yet. WE want you to hold them in position as you place the piece on a level surface (see Figure 2). In order for her to lean flatly against a wall, her two palms and two elbows should all hit the same flat plane, in this case, your tabletop. Understand? Great. Now just a couple drops of any cyanoacrylite glue (Super or Crazy glue) on the flats will hold arms in place. After that's set, you can turn it over and fill up the gap up with more glue.
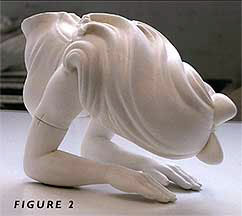 All should lay
flat.
All should lay
flat.
![]() Pinning
Pinning
On a kit this large we highly recommend "pinning". Use coat hanger wire or better, #4 finishing nails. At a slant, drill a hole that passes through BOTH resin parts. Push a snug-fitting wire or nail into the hole. Mark the pin where it exits the resin and take it back out. Cut the pin a bit shorter than the mark.
Now you're ready to glue it in. You'll have to be very fast
because you will only have about 3 seconds to get the pin all
the way in before the glue grabs. To assist in the speed, make
this simple tool for countersinking the pin. Drill a 3/4"
deep hole
into the end of a 4" long dowel rod and glue a nail that's
the same size of your pin into it. Use this tool for pushing
the pin in below the surface.
Holding the very tip of your pin with needlenose pliers, slather
glue up and down it. Hold the piece with your legs (to free up
both hands). Now, QUICKLY jam the pin into the hole, pick up
your home-made tool and countersink the pin below the resin surface.
A second pin coming in at another angle will make the arm joint
unbreakable. Then, just repeat the process on the other arm.
That's about the hardest part of this whole piece. If you got
that, you're practically home free.
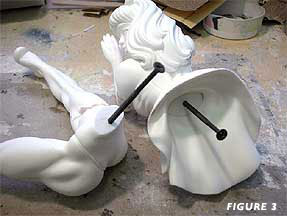
Now, attach the skirt to
her waist as shown in Figure 3. Test fit first. Note that
there are two ridges at the base of her bare back that match
two ridges on the back side of the skirt. Line them up. Then,
just draw a ring of glue around the perimeter of the waist and
around the rim of the skirt and press tightly till set.
Now, for attaching the small leg piece to the big leg piece. It's self-evident how they line up. Find the witness marks, line up and glue flat side to flat side. We recommend pinning the leg in at least 2 places, but 3 is even better. Use the same method as you did on the arms.
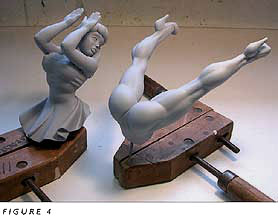
The temptation now is to simply glue the legs into the skirt, but don't. That will make painting under the skirt a living hell. We'll save that final assembly until after all painting is complete. For now, it's putty, sand, prime, sand, putty again, sand again, and prime again until you eliminate all traces of a seam in the joinery. See Figure 4 below of two main primed parts ready for painting. Note that we have drilled holes and inserted long drywall screws. (Figure 3). These are good for handling the pieces without touching them.
Painting the Figure
![]() Painting Flesh
Painting Flesh
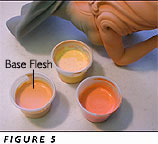
It's always a good idea to paint flesh colors in daylight. We recommend doing flesh color first, because your clothing color scan be "tuned" to fit the flesh color. First, make 4 ounces, of base flesh (that's the middle- toned color in Figure 5). From that, make an ounce of a lighter version of the base color, and an ounce of a darker version of your base color. The light goes on the crown of the muscles. The darker version in the crevices. If you get to contrasy, no problem...just go over everything with a mist of the base color to tone it down.
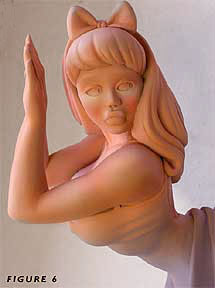
A little light on the tops of her cheeks is nice. Then put
a drop or two of red or florescent pink into your darker flesh
color and mist a dot onto the apples ofher cheeks (Figure
6). Secret: we also used this glowing-pink color to warm
up her backside.
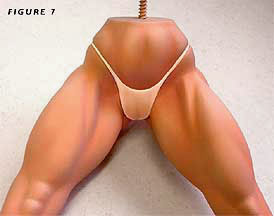
You could simply brush-paint her panties solid white, but for a little added naughtiness we masked off her legs and airbrush a mist of white around just the perimeter, leaving a bit of flesh color visible (Figure 7). Also, a close up detail view of this is shown in the Kami thumbnails, back on her main webpage.
Once you have all Kami's skin the way you like it, give her
a light, but wet coat of "Testors Dull Cote"®
Lacquer. It's the
absolute best model product we know. Let her dry a good half
hour and put on another coat. At this point, we STONGLY recommend
letting the Dullcoat finish dry overnight.... Let it get good
and hard. Then relax. Your work up until now is well protected,...
and you'll need that for what's next.
![]() Painting the Dress
Painting the Dress
Now, we're ready to paint the dress, shoes and hair bow color. We think it's a cute idea if these items all match, but you're free to do as you please. Also we recommend light, cheery, pastel colors. If you're at a loss, here's some we know will render a nice effect: Pink, Lavender, Yellow, Lime, Seamist, Light Aqua, Perwinkle (which is a light blue/lavender), and Light Tangerine.
Mask off all skin (and panties). To do a good job will take some time. You want a really good seal on the edges. We took a wood toothpick and rubbed down all the tape edges. Now, here's a little trick you'll thank us for... before painting the skirt color, first airbrush the base flesh color over all edges, where paint might bleed under the tape. This does two things. It seals the edges for good, BUT... should there be bleed gap, the bleeding color will be about the same as what's under it and not show much. Smart, eh? Now just paint your dress, shoe and hair-bow colors.
DO NOT Dull Kote seal with piece still masked. That makes
tape glue gummy. Just let paint dry well and remove tape carefully.
If it looks like the paint will tear, an X-acto knife cut at
the tape edge will help make a clean,easy release. Putting a
drop of airbrush cleaner on a Q-tip can erase any bleeds you
find lon the skin. Retouch with a paintbrush and your original
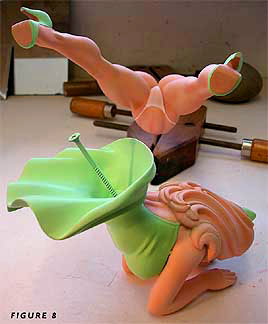
flesh colors as needed. With a paintbrush, paint in the tan leather
of her shoe soles (Figure 8). Now,... give her a light
Dull Cote and breathe easy. This will protect all you've done
so far.
It's hair time. And ...masking-time again,. But at least it's only on one part. Put the leg section away someplace safe for now. Mask off skin and dress of the other part. Again, press all edges tightly with a toothpick. If you have a clear acrylic sealer, you can use that to seal edges but DON'T use Dull Coat to seal your tape. Remember, Dull Coat is lacquer based, and will liquefy the tape's glue...a total mess.
We chose a sort of strawberry tangerine (Figure 9) for Kami's hair color on the lime-clothed piece. On another kit, we did her yellow blonde. But honestly brunette, shocking pink, vivid blue, or jet black might be very cool hair colors too. Airbrush it in several light coats, just enough to cover; not bleed. If a bit of flesh color shows through, it's helpful in that it visually pulls the piece together.
Now, very, VERY lightly mist hair with Dull Cote. Not wet, just a breath of it. Let that dry5 or 10 minutes. Mix a dark version of your hair color and thin it out until watery. With a paint brush flood it over the hair's base coat, twisting the piece so it flows into all the depressions. Keep twisting all around as it dries. You'll see it collect in the crevices. Once that's dry, remove masking tape, and touch up leaks that might have crawled under the tape, and LIGHTLY seal the hair again.
![]() Painting details of the Face
Painting details of the Face
Now for the fun detailing. With the exception of eye shadow,
we painted our face with a bristle paintbrushes in a sort of
Disney style (Figure 10). It just seemed appropo to the
design of the piece. But you can do a softer, more realistic
style if you like. Just keep her pretty, as faces set the mood
of finished piece. If you want to match Mike's style, study the
facial close-ups on Kami's main webpages.
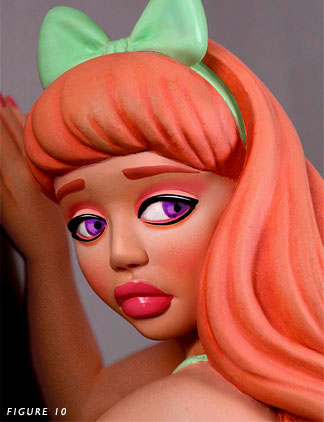
Note the candy-like eye colors. We did purple irises for the redhead, bright aqua for the blonde. Lime geen would be lively iris color too. Just keep your eye colors fresh. We matched her fingernail polish to her lip color. The final thing we did was brush-paint high-gloss acrylic clear coat over her eyeballs, lips and fingernails. It makes a nice contrast to the matte skin. Brings her alive.
![]() (Optional) Creating a Base
(Optional) Creating a Base
To be completely honest, Mike couldn't decide what kind of base to create. So, he decided to save the modeler some kit money and leave it to the modeler. But here's some of his ideas:
- 1.) A graffitied brick wall and cement sidewalk, as if
an alley.
- 2.) A chain link fence, as if on a playground.
- 3.) Completely inclosed a glass box, like a captured specimen
- 4.) A bookend - base only. no vertical element.
- 5.) No base at all. She simply leans against wall, double-sided tape on feet.
- 2.) A chain link fence, as if on a playground.
Anyway, it's you're call...and that's the best part of figure modeling. We hope you enjoy, Kami!