Instructions and Painting Tips
Assembly
 Parts Check
Alright-get ready to create the baddest girl this side of Andromeda.
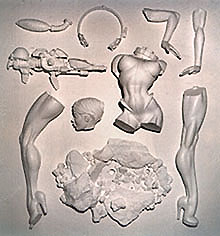
First thing you need to do is unwrap all the parts and lay them
out to make sure you have everything you need. There should be
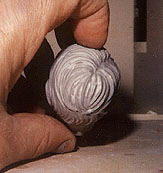
11 white resin parts (shown at right), Non-resin parts include
a halved clear-plastic sphere, a spiral metal antennae, a colored
plastic bead, a tiny oval metal bead, and a sheet of decals.
 Prepping
Before grinding off the casting stubs, please make note: DO NOT
CUT OFF THE TWO PEGS COMING OUT OF THE BOTTOM OF HER BOOTS. These
are support pegs, crucial to the structural integrity of the piece.
Grind off any casting sprues. After the major cleanup is done,
it's time to give the kit a good bath to get rid of any mold release-(mold
release will keep any paint from sticking.) You can scrub down
the kit with a solvent like lacquer thinner (best) or alcohol,
and even warm (not hot) soapy dish detergent water. Dry thoroughly.
Now, you can do finish sanding on seams and any hole filling,
with the hobby putty of your choice. If you can take short bursts
of the fumes, we recommend auto body putty. It's cheap and dries
fast.
 Assembly and Puttying
 We highly recommend "pinning" the
legs. Let's start with the right leg. Clip the head off a 2-inch
nail, or better yet, a screw. Drill a 1-inch deep receiving hole
into the center of the leg flat. Slather glue on half the screw
and twist it into the hole, leaving half sticking out. Wipe off
excess and let glue set. Now drill a larger diameter hole into
the torso part of the leg that can receive the 1-inch of the screw
sticking out. It should be a very loose-fitting hole, so that
you can wiggle the legs around to line them up perfectly. Test
fit. When you are satisfied that it's a perfect match-up, slop
putty into the big hole, spread glue on the leg flats and squish
together tightly. Hold until set.
We highly recommend "pinning" the
legs. Let's start with the right leg. Clip the head off a 2-inch
nail, or better yet, a screw. Drill a 1-inch deep receiving hole
into the center of the leg flat. Slather glue on half the screw
and twist it into the hole, leaving half sticking out. Wipe off
excess and let glue set. Now drill a larger diameter hole into
the torso part of the leg that can receive the 1-inch of the screw
sticking out. It should be a very loose-fitting hole, so that
you can wiggle the legs around to line them up perfectly. Test
fit. When you are satisfied that it's a perfect match-up, slop
putty into the big hole, spread glue on the leg flats and squish
together tightly. Hold until set.
Now, place the foot peg into the proper hole in the base. As
you attach the left leg in the same manner, make sure the left
foot lines up with the base hole for it. Once completed, putty
and sand seams really well.
 The Arms
 You may also wish to pin the arms. Small
finishing nails will be fine for this. Same procedure as the legs.
It's obvious how the left arm fits, because of the hip indentation
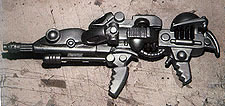
for her hand. For the right arm, stick the rifle in place to confirm
that it will fit, as you glue up.
You may also wish to pin the arms. Small
finishing nails will be fine for this. Same procedure as the legs.
It's obvious how the left arm fits, because of the hip indentation
for her hand. For the right arm, stick the rifle in place to confirm
that it will fit, as you glue up.
Once arms are firmly attached, you'll have a pretty clear idea
of the incredible body language on this gal. Putty the arm seams
and sand smooth. To check for imperfections, spray with a grey
(best color) SANDABLE lacquer-based primer. (Almost any auto spray-can
primer is lacquer-based-try K-Mart.) Sandablity is important though,
because primer is made to be a sort of filler. You spray it, you
sand it, spray, sand, etc., until every trace of a seam is gone.
 The Head
 Doubtless by now, you have mumbled a small
curse word directed at that post coming out of the back of Venus's
pretty head. Well, that post enabled you to get a near-perfect
face, so... live with it.
Doubtless by now, you have mumbled a small
curse word directed at that post coming out of the back of Venus's
pretty head. Well, that post enabled you to get a near-perfect
face, so... live with it.
Actually, it's a pretty simple matter to re-sculpt that bit
of hair, only a minute or two with a Dremel tool. When you get
her head looking good, DO NOT glue it to the neck. Set it aside,
to paint separately.
Putty, sand and clean up the remaining resin parts and prime
them. A light 320-grit sanding on the helmet-band, the oxygen
tank, and the rifle will do wonders once the metallic paint is
applied. The base?-just prime.
Painting
Painting the Body
 Well, this may be the easiest large piece
of resin you will ever paint. We recommend going to an auto supply
store like NAPA, or anyplace that might stock automobile retouch
paints in little spray cans. These are great paints in general.
They are lacquer-based and give great, techy-looking, car-quality
finishes without having to gloss coat. You spray on two medium
coats and your done. Dries really hard in an hour.
Well, this may be the easiest large piece
of resin you will ever paint. We recommend going to an auto supply
store like NAPA, or anyplace that might stock automobile retouch
paints in little spray cans. These are great paints in general.
They are lacquer-based and give great, techy-looking, car-quality
finishes without having to gloss coat. You spray on two medium
coats and your done. Dries really hard in an hour.
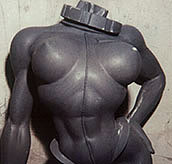
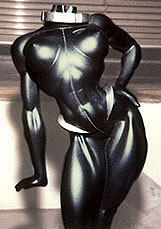
We picked a dark GM gun-metal grey. The paint has teeny metallic
flecks that makes her body look like some government-issue weapon.
We let that lacquer dry for an hour and tape-masked all, leaving
the two fins and the neck ring exposed. (Tip: lacquer paint disolves
tape adhesive. So after masking, seal tape with a light covering
spray of acrylic paint.) Let that dry and THEN spray the silver
lacquer on the neck-ring and fins.
Just peel off your masking, do a little brush touch-up and
guess what? That's it-the body is done. Wow, was that easy, or
what?
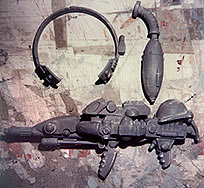
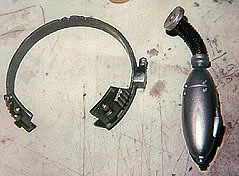
Helmet-band and O2 Tank
As long as you've got the lacquer out, you might
as well finish up with the metal work. Spray the helmet-band the
same color as the suit. Silver detailing to your liking. Paint
O2 tank and little attachment flange, silver. Hole in the cap
and hose, paint matte black.
Paint gun silver. Let dry. Then detail both tank and gun. Get
some enamel-based, black paint (like in Testors bottles) and brush
a thinned coat all over. Immediately wipe off surface
to re-expose silver, leaving black in the crevices.
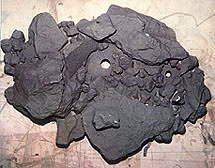
Painting the Base
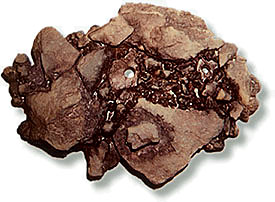 Painting the base is the exact opposite technique
of painting the suit. Unlike her slick, techy-looking metallic
suit, the ground she stands on should be as grimey as you can
make it. Painting the base is the exact opposite technique
of painting the suit. Unlike her slick, techy-looking metallic
suit, the ground she stands on should be as grimey as you can
make it.
If you saw us painting our base, you'd have laughed out loud-a
blur of experimental color washes, drybrushing, raking airbrush
mists from the sides, wiping off paint for highlights, back and
forth with different colors-a real mess. But actually, you can't
go wrong. The more you play around, the better it looks. We stopped
when we found a nice Martian-red color that mimmicked some of
the tones in her face and hair.
Painting the Head
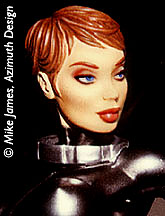 First of all, always paint flesh in daylight.
Otherwise... bad surprise later. Skin We've
found adding 2 or 3 drops of straight orange, maybe 8 drops of
pink, and a drop of yellow or lime green to a half ounce of bottled
caucasion flesh produces a fresh ingenue coloration. Eyes
After doing all skin, we paint the eyes. Straight black on the
lashes. White for the whites, blue-green irises (if you like),
and black pupils. Then we darken the top third of the eye whites
with warm light grey, as if her eyes are in shadow from her long
lashes. Darken the iris tops too. The upper eyelids we leave alone.
But above them, we put a fleshy brick-red in the crevice and gradate
lighter to the eyebrows. Not too dark, leave some of the original
flesh color directly under the eyebrows. We take a line of the
brick flesh and swipe under her lower lashes too, for that smoky,
bruised look. Mouth We think this sultry face
screams for slick, wet, lipstick. We opted for brick red, like
her hair. Go slightly darker on the upper lip. Lighter brick on
the lower lip protrusions. Then a dark brown red line in the crevice
where the lips meet. Little dark dots in the corners. Details
With darker flesh, we dot the insides of her nostrils and the
crevices in her ears. We brush on a light flesh line down the
bridge of her nose and feather-blot with a cotton swab. Seal finished
face with a nice wet coat of "Testors Dull Cote" and
let dry for an hour or so. Hair We masked off
the face and airbrushed her hair an orangey-brown. We paint-brushed
a dark brown wash into the crevices. Then, drybrushed crowns of
hair with lighter pinkish-orange. If hair looks too contrasty,
soften by misting all over with original hair color. Strip off
masking, brush touch-up the details and dull coat all. Gloss touches
to the eyeballs and lips are a great nuance. First of all, always paint flesh in daylight.
Otherwise... bad surprise later. Skin We've
found adding 2 or 3 drops of straight orange, maybe 8 drops of
pink, and a drop of yellow or lime green to a half ounce of bottled
caucasion flesh produces a fresh ingenue coloration. Eyes
After doing all skin, we paint the eyes. Straight black on the
lashes. White for the whites, blue-green irises (if you like),
and black pupils. Then we darken the top third of the eye whites
with warm light grey, as if her eyes are in shadow from her long
lashes. Darken the iris tops too. The upper eyelids we leave alone.
But above them, we put a fleshy brick-red in the crevice and gradate
lighter to the eyebrows. Not too dark, leave some of the original
flesh color directly under the eyebrows. We take a line of the
brick flesh and swipe under her lower lashes too, for that smoky,
bruised look. Mouth We think this sultry face
screams for slick, wet, lipstick. We opted for brick red, like
her hair. Go slightly darker on the upper lip. Lighter brick on
the lower lip protrusions. Then a dark brown red line in the crevice
where the lips meet. Little dark dots in the corners. Details
With darker flesh, we dot the insides of her nostrils and the
crevices in her ears. We brush on a light flesh line down the
bridge of her nose and feather-blot with a cotton swab. Seal finished
face with a nice wet coat of "Testors Dull Cote" and
let dry for an hour or so. Hair We masked off
the face and airbrushed her hair an orangey-brown. We paint-brushed
a dark brown wash into the crevices. Then, drybrushed crowns of
hair with lighter pinkish-orange. If hair looks too contrasty,
soften by misting all over with original hair color. Strip off
masking, brush touch-up the details and dull coat all. Gloss touches
to the eyeballs and lips are a great nuance.
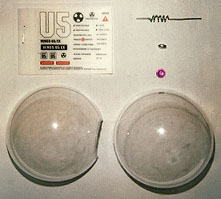
Attaching Helmet and Oxygen Tank
Helmet Pin and glue the head on. Then, throroughly
clean and test-fit the helmet. Look down from above to make sure
opening is centered on neck ring, and that helmet seam is perpendicular
with head. Practice taking helmet halves off and on quickly. On
the top surface of the neck ring, take a knife and scrape through
paint to expose resin in 4 neat, evenly spaced patches. Now, you
have to act quick and precisely. Put small dots of glue on these
4 patches (not too much, glue fogs plastic bubble!). Then put
three tiny dots on helmet seam. In one careful move, bring the
2 halves together trapping the head, and then down to make contact
with the neck-ring. Let set, DO NOT spray with ACCELERATOR! (it
fogs too). Glue antennae with metal bead to helmet-band by drilling
a small receiving hole. Then, with spare use of glue, attach helmet
band (slide on from back side only). The little colored crystal
glues on top. Tank Test fit and pencil a few
witness marks. (Note: the hose flange should fit flush where it
contacts clear plastic.) Scrape off paint on Venus's back indentation
and corresponding patch on tank to get a strong resin-to-resin
contact point. Glue tank only at this point. It is not necessary
to glue flange to helmet. Ta-da!! You're finished!
Back to Venus Page
Copyright © 1998 Mike James, Azimuth Design.
The Agent Venus character, in whole or in part, likenesses thereof, storyline, costume and all related materials are copyrighted
and registered intellectual property of Azimuth Design. All rights reserved, in any media.
The Gremlins in the Garage webzine
is a production of Firefly Design. If you have any questions or
comments please get
in touch.
Copyright
© 1994-1997 Firefly
Design.
|