 |
|
|
|
Click on picture for a larger view. |
|
 |
 plus $30.00 shipping and handling (in USA)
Make check or money order for $240.00 payable to Azimuth Design

Copyright © 1997 Mike James, Azimuth Design.
The Bad Tabitha character, in whole or in part, likenesses thereof,
storyline, costume and all related materials are copyrighted and
registered intellectual property of Azimuth Design.
All rights reserved, in any media.
Bad Tabitha Comic Book (No
longer available)
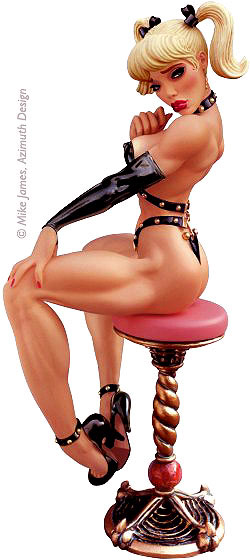
Little Tabitha, a sweet, but neglected, young
orphan, inheritsan ancient trunk. Inside it, she finds a teeny
little "witching"outfit. Timidly, she slips into the
wicked straps and soon discoversa spell prevents it from coming
off. Worse yet, while wearingit, she is a slave to anyone's request.
The kit comic tells ofher first spicey escapade as an endearingly
inept novice witchwith a big problem.
Click on pages for full screen
view. Congradulations to all of you who own this wonderful
Tabitha comic. This ash can edition was hand written,
handdrawn and hand printed by Mike James. There are very few
of themout there so hang on to them. To find out more click on
one ofthe sample pages above to see a closeup.
|
Assembly Instructions
 PartsCheck
Before beginning, let's do a partscheck.
There should be a large torso piece, two legs,two arms, a head,
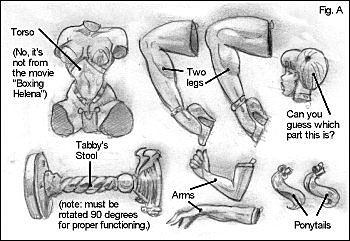 two ponytails, and
Tabby's stool. To assemble. . . put together.
two ponytails, and
Tabby's stool. To assemble. . . put together.
 Cleaning up the Parts
Ha ha, just kidding. Actually there is a lot of work to do beforeassemblage,
because certain things are easier to do when the kitis still in
pieces. Like grinding off the casting sprues and fins.And then
the tedious little job of filling any tiny air-bubbleholes with
putty (No, those two "big" cylindrical holesin her noggin'
are NOT air-bubble holes. Leave them alone.
 Attaching the Legs
Once all Tabitha'spieces are immaculate, you're ready to glue
'em up. First thelegs. It's pretty obvious which is the right
leg and which isthe left leg when you hold them up to her torso.
Proper "alignment"however, can be tricky, so we did
something to make it 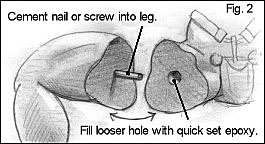 easier.You
will see tiny little scratch marks on the bottom of each thighwhich
corresponds to scratch marks on the thigh sections of thetorso.
Neat huh? With marks lined up, note how muscles and tendonsline
up on top. As you can see, little Tabby's legs look strongenough
to choke a horse. Nevertheless, we recommend further strengtheningby
"pinning" the legs to the torso. Here's how. (Fig.2).
easier.You
will see tiny little scratch marks on the bottom of each thighwhich
corresponds to scratch marks on the thigh sections of thetorso.
Neat huh? With marks lined up, note how muscles and tendonsline
up on top. As you can see, little Tabby's legs look strongenough
to choke a horse. Nevertheless, we recommend further strengtheningby
"pinning" the legs to the torso. Here's how. (Fig.2).
 Pinning
Let's do her rightleg first. Drill a hole about an inch deep into
the center ofthe flat of the leg that will "snugly"
accept a nail.Glue and insert a big nail, and clip off the end
leaving aboutan inch sticking out. Then drill a bigger hole into
the torsopart of the leg. Test fit. The parts 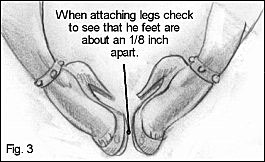 should butt, resin to resin,but be able to
slide around a bit for perfect alignment. Got it?Good. Now, fill
the larger hole with 5-minute epoxy and set itdown for a second.
Using Cyanoacrylite glue (super glue), slatherthe flat of the
leg piece. Now, place the torso piece in a sittingup positon on
the edge of your table and squeeze the leg on. Thisis your last
chance to make corrections, so align it correctly.Make sure the
thighs fit "flat" on the table - theyshould not rock.
This is important to make sure your piece willfit flat on her
stool. Hold and let set, then take a breath anddo the same for
the other leg.
should butt, resin to resin,but be able to
slide around a bit for perfect alignment. Got it?Good. Now, fill
the larger hole with 5-minute epoxy and set itdown for a second.
Using Cyanoacrylite glue (super glue), slatherthe flat of the
leg piece. Now, place the torso piece in a sittingup positon on
the edge of your table and squeeze the leg on. Thisis your last
chance to make corrections, so align it correctly.Make sure the
thighs fit "flat" on the table - theyshould not rock.
This is important to make sure your piece willfit flat on her
stool. Hold and let set, then take a breath anddo the same for
the other leg.
 Puttying the Legs
Lissin' up! Afterattaching the legs we suggest taking the time
to putty the seams,because you have complete access to all sides
of the seams. Also,it is  absolutely
CRITICAL that these seams be "blended"well. We cannot
stress this enough. They will be "highly"visible and
only an absolutely PERFECT putty and sanding job willrender a
satisfactory piece. (Don't worry, after this, it's abreeze.) We
used auto body putty because it sets completely inminutes and
makes quick work. We did 3 applications sanding downeach as if
it were the final filling. Then we checked by sprayinga coat of
primer on the seams. We found more to putty and sand,sprayed another
coat of primer and sanded smooth to 320 grit.Take your time, and
repeatedly check your work with primer. Don'tstop until the tiniest
indication of a seam is gone. The lastthing you want, is to get
started painting the flesh color andTHEN discover you can still
see a line. It would ruin the kit.
absolutely
CRITICAL that these seams be "blended"well. We cannot
stress this enough. They will be "highly"visible and
only an absolutely PERFECT putty and sanding job willrender a
satisfactory piece. (Don't worry, after this, it's abreeze.) We
used auto body putty because it sets completely inminutes and
makes quick work. We did 3 applications sanding downeach as if
it were the final filling. Then we checked by sprayinga coat of
primer on the seams. We found more to putty and sand,sprayed another
coat of primer and sanded smooth to 320 grit.Take your time, and
repeatedly check your work with primer. Don'tstop until the tiniest
indication of a seam is gone. The lastthing you want, is to get
started painting the flesh color andTHEN discover you can still
see a line. It would ruin the kit.
 Attaching the Arms
Again, pin botharms using the same method as the legs - maybe
smaller nails though.The right arm is self-aligning. Glue the
forearm to the lowerpart of her breast. (Yeah, we know, that 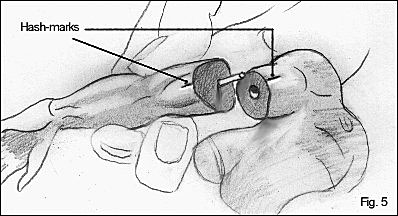 breast looks really weirduntil
you get the arm on.) For the stretched-out left arm, wehave again
provided a little hash-mark on the underside to assistaligning
(Fig. 5). Since the seam is at the glove border, youhave almost
no puttying to do. (We're just so proud of ourselves.)But, if
you DO putty, try not to fill in that "rounding"of the
arms as they enter the gloves. That indicates the glovesare "squeezing"
her arms. And of course, you have noticedthe odd little indentions
in the legs to accomodate the thumband forefinger.
breast looks really weirduntil
you get the arm on.) For the stretched-out left arm, wehave again
provided a little hash-mark on the underside to assistaligning
(Fig. 5). Since the seam is at the glove border, youhave almost
no puttying to do. (We're just so proud of ourselves.)But, if
you DO putty, try not to fill in that "rounding"of the
arms as they enter the gloves. That indicates the glovesare "squeezing"
her arms. And of course, you have noticedthe odd little indentions
in the legs to accomodate the thumband forefinger.
 Attaching her noggin'
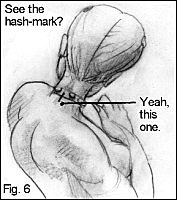
Can anyone say "hash-marks"? Well, it may require atunneling
electron microscope to find them, but they're there,between two
studs on the back of her collar and on the spinalarea of her neck
on the torso piece (Fig. 6). Test fit, match'em up, and you should
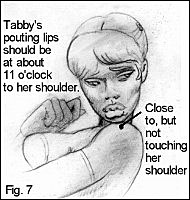
be dead on. But just to make sure you don'tput her head on backwards,
check this. The chin should be directlyover the outer-most indication
of the left clavicle. Not touchingit, but almost (Fig. 7). Okay,
now guess what. Yup, "pin"that sucker! A tight hole
in the neck of the head - a sloppy holeinto the neck of the torso
piece. Glop on some epoxy. Spread alittle super glue on the flats.
Presto!... Tabby's givin' youthe eye.
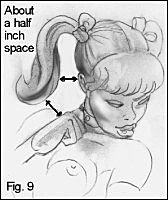
 World's cutest ponytails
Les'see, two ponytails with posts, and two holes.... I wonderhow
they attach...Duh! Not so fast there, smartypants. It's abit more
complicated than you might think. First, there's somework to do.
Get an appropriate sized drill bit and carefully drillout the
resin in the inside loops of the ribbons. Little rat-tailfiles
can thin the edge to get a thin-looking ribbon. Cool, huh?Uh,
uh, uh, we're not ready yet. Before you start sloppin' onthe glue,
we suggest you take a close look at the photos provided,to find
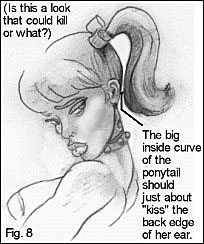
out which is the right ponytail and which is the left.Clue. One
ponytail has two pointy tips on the end, the other hasthree. The
one with two goes over her back. It should be gluedin so that
the big loop of hair almost touches her ear - abouta 1/16th of
an inch (Fig. 8). The other dangles way away fromher head - about
a half inch in fact. It should also be abouta half inch from the
top of her right hand. (Fig. 9).
Well,...you're done. Now, did we lie? After that leg puttyingbit,
it went pretty quick didn't it? Now, it's time to prep littleTabitha
for some paint.
Painting Tips
Prep Wash
Before you get to do anything with Tabitha, she insists on a goodbath
in warm (not hot) soapy water. And she likes Q-tips. Actually,the
bath is to remove the mold release agent on her. Dishwashingdetergent
and a toothbrush is what we use. Q-tips get in all thehard to
reach places. After washing, dry thoroughly. Use a hairdryer (don't
use hot setting) to blow out water clinging in crevices.
Priming
As any kit-building veteran can tell you, you MUST prime a resinkit
before painting. Paints will not stick well to raw resin andsometimes
oils in the resins leach through over time, ruininga paint job
months later.
Mixing Flesh
It's always a good idea to paint flesh colors in daylight. Itbecomes
a MUST when your kit is 90% naked and at a huge 1/4 scale.We suggest
setting up a table at a big window. There are manypre-mix "flesh"
colors out there and they all stink.They are variations of Tan,
which is brown and white, and looklike dirt unless doctored. We
recommend using the following recipeto make your own flesh. Lots
of white, equal amounts of pink andthat dirt color called "flesh",
then add some dropsof straight orange, and more drops of yellow.
In the right amounts,this will give you a knockout "peachy"
color that brimswith life. If it looks too harsh, try adding white
and a coupledrops of lime green. Never darken with black.
Applying Flesh
We've seen smooth flesh tones done superbly with a brush. Butoil
paints were used, which can be blended well. Blending is thekey,
and if you are using water-based paints, there is reallyonly one
way to go, airbrush. If you regularly build kits anddon't have
one, get one. They are pretty cheap nowadays and reallyfun. Now,
take your custom flesh color and coat her solidly. Next,make a
slightly darker, orangey version of your color, and a lighterversion
(double the white). Lightly mist the muscle "crevices"with
the darker version, and lightly mist the crowns of the muscleswith
the lighter version. If you go too far and there is too muchcontrast,
no problem, just evenly mist the original flesh backover the whole
kit. We suggest a darker orangey-rose tonationto the apples of
her cheeks and her buttocks. Now, seal your workwith two light
coats of Testor's Dull Coat.
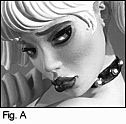
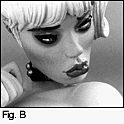
The Eyes
Airbrush a rich, dark, soft edged, red-brown oval all around hereyes,
thicker above and thinner below. Paint top 1/3 of whitesgrey,
as if in shadow. Gloss coat eyes, lips and nails (Fig.Aand B).
It should look almost like twin "shiners". Usea rosey
color and a brush and draw a light cresent to indicateher eyelids
catching light from above. The upper eyelash shapesare pretty
obvious - brush on straight black, following the sculptedcontours
on top, then continue, drawing a thin cresent below thelower lids,
tapering off before you reach the insides of the eyes.With black
still on your brush, fill in that drilled hole indicatingthe pupils.
Then paint the whole eyeball (except the black pupil)white. Choose
your eye color and paint a "light" versionof it for
the iris. Then outline that color with a "darker"version
of the same color. Paint a very thin pink-flesh line betweenthe
whites and the black lower lashes. People usually miss thisaccent.
  |
Lips/Hair
Mix up hot-pink red, as bright a color as you can make. Fill inher
lips and fingernails. For a real kicker, put a few drops offlorescent
pink into your color. Take this color and hit the highspots on
her lower lips. That brings out the pout. Draw a thinline in the
crevice between her top and lower lips with dark red.Seal the
face with Dull Coat. For blonde hair, mix yellow, flesh,and tons
of white. Paint her hair solid. Then make a wash fromyour dark
flesh and flood it over the hair so it gathers in thecrevices,
and try not to let it run down the face. But even ifit does, the
Dull Coat protects her face, and you can wipe itoff.
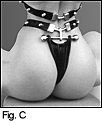
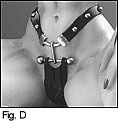
Metal and Stool
For Tabitha's tiny bikini "hardware", we suggest mixingmetallic
silver and metallic gold to get a sort of white goldlook. Gloss
coat the black rubber bikini (Fig C and D). The metalpart of the
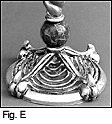
stool should first be sprayed flat black. Then thewhite gold color
can be drybrushed on the high surfaces. Whenthat dries, put a
turquoise wash over the metallic parts to simulatea patina in
the cracks. The ball of the stool can be made to looklike faux
marble by dabbing on various reddish colors with a sponge,(Fig.
E) and then drawing a few craggy lines in a lighter pink.Gloss
coat the ball when done. Ta-Da!
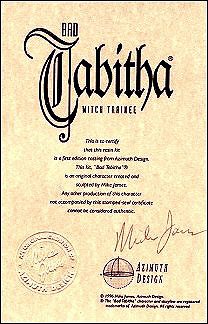
We have had a lot of illegal knock-offs of our
kits sold in foreign countries.
Remember, Azimuth Design only sells directly to
the customer, not in stores. If your kit does not include
the Certificate of Authenticity below, with the
Raised Seal and personally-inked signature
of Mike James,
you do not own a Mike James original piece of art.
It takes a lot of time, skill and money to bring you these precious
girls. Please support creators, not thieves.
Contact us if you suspect illegal activity, or if you see a Mike
James kit or image being used for profit.
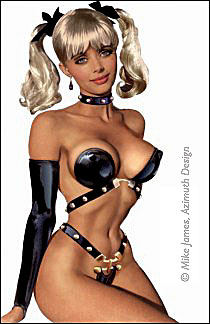
11" x 17" poster shown here comes with
kit purchase.
Copyright © 1997 Mike James, Azimuth Design
The Bad Tabitha character, in part or in whole, likenesses thereof, storyline,
costume and all related materials are copyrighted and registered intellectual
property of Azimuth Design. All rights reserved, in any media.