![]()
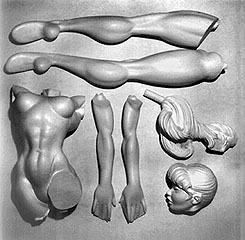
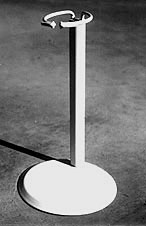
We think Oona is a great kit! It's astonishing how these few simple resin parts yield such a spectacularly dynamic figure. First thing to do once the kit is in your hands is to make sure you have everything. There should be 7 good-sized resin parts - a torso, 2 legs, 2 arms, a head and ponytail. There is also a metal stand and a little plastic bag of finishing accessories. Everthing check out? Good.
First assembly should be the legs. Grind the casting-sprue pegs off the leg flats. Also the two on the bottom of the torso. Test fit. You could probably get by with just gluing the legs on, but on larger kits like this, we suggest pinning. Here's how.
Cut the head off of a 2-inch nail or screw. Grab one leg and drill a hole, about an inch deep, into the center of the leg flat, keeping the drill bit roughly perpendicular to the flat. Test fit the nail or screw and glue it in leaving an inch sticking out. See drawing. Do same proceedure to the other leg.
Now, drill inch-deep bigger diameter holes into the center of the torso's leg flats, again trying to stay perpendicular to the flats. Test fit. Drill out more material if necessary, so you can wiggle around the peg to get a perfect matching fit on the outside edges. Test fit again and familiarize yourself with how to fit parts exactly.There are little scribed lines on the underside that can help you line things up.
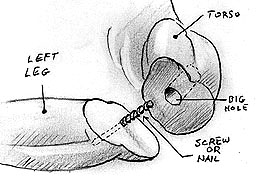
Now to glue up. You'll have to work quick here, one leg at a time. We recommend auto body putty for filling the holes. First, set out your glue and have it ready. Mix up a small batch of putty and only half-fill the big sloppy torso holes. Smear some putty on the protruding nail or screw threads. Now, before the putty sets, put glue on both flats, carefully line up, and press the parts together. You will only have about 2 seconds to make any correction, so get the fit right immediately!
You can tidy up the legs seams with putty now, or move on to attaching the arms. Even more so than the legs, the arms should be pinned. The proceedure can be exactly the same, though you can use smaller pins.
If you want the "quickie" pinning method, and don't mind puttying a visible surface hole, here's a shortcut. Simply sand the flats of both pieces and glue them up. NOTE: The "left" arm has the letter "L" scribed on the flat. Match that to the "L' on the left torso arm flat.
After gluing, select a smooth pin, like a #4 finishing nail (which is what we used). A section of clothes hanger wire or big paperclip wire is also fine. Pick a drill bit the same diameter as your nail or wire. Drill a hole from the back of her shoulder about an inch deep, making sure not to drill through the front of the arm.
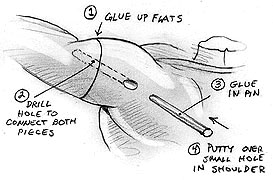
Test fit your pin. Push in all the way and mark where it enters the resin. Now cut it, not at the mark, but a tiny bit shorter.
That way, it will be beneath the surface. Now to glue the pin in. TIP: Put glue in the drilled HOLE, not on the pin. This way it won't accidentally set up when only halfway in, which can occur. Also, when you put it in, put it in fast, and have something handy, like another nail, to push it in completely.
We won't bother telling you how to pin the head. You're probably an expert by now. Just sand each flat perfectly smooth drill a few centered holes and glue up.
As for the pony tail, it's easiest to clean it up good before attaching to head. Grind off any casting fins. DO NOT cut off the ponytail post! There are 2 scribed lines on it. The one closest to the ponytail indicates how much of the post should be left sticking out once inserted into the head. The second line, way out about 3/4th of an inch from the ponytail, is where you cut it.

Once cleaned up, you can glue it in. Double-check photos for position. The two smaller hair-sections hang down. Test fit. Sand post if necessary to achieve a nice fit. Once again, USE THIS TIP: Put glue in the HOLE, not on the peg. Otherwise, it could freeze up halfway in. You definitely don't want that to happen. Now, you're ready to putty all seams and sand. Good modelers know craftsmanship is critical here. Don't rush it. You can test the seamlessness of your work with a light coat of primer.
The casting process leaves a residue of mold separater on the resin parts. This residue will keep any paint from adhering and so it must be removed. You can use lacquer thinner or alcohol to scrub down the parts. This also removes the grease from your hand prints. After this, a lukewarm (not hot) soapy bath.
Use a lacquer-based (most common) spray automotive primer. Light grey is best. A covering coat will do. You may wish to lightly sand with 400-grit sandpaper, wipe clean, and prime again very lightly.
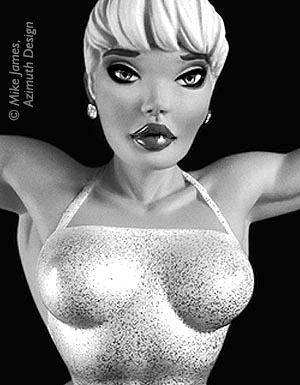
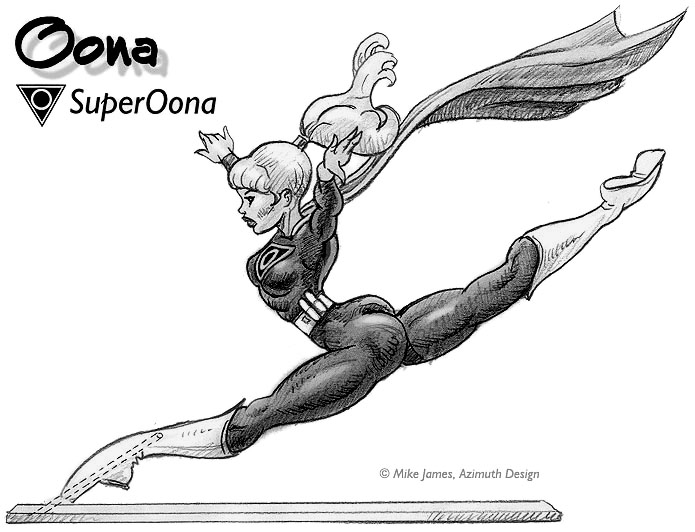
Flesh is about 80% of this kit's surface, so it's important that the color be just right. We highly recommend ONLY painting flesh in daylight. Either set up near a big window, or mix your colors in daylight. The only caucasian flesh color we have ever found that is good right out of the bottle, is Badger's¨ "Flesh".
We suggest using an airbrush and airbrush colors, though we have seen beautiful jobs done with delicate brushwork. Mix up a beautiful, peachy flesh color. Start out with 3 ounces of white and slowly add drips of orange, brown, and tiny amounts of yellow, to get the color of flesh you desire. It may appear a bit too colorful. If so, use a couple drops of lime green or turquiose to take the edge off.Never use black in mixing flesh! And don't go too dark - remember, the paint will dry darker.
Spray a few light coats over the ENTIRE kit, hair and suit included. (We'll tell you why later.) What you want is to completely and opaquely cover the entire surface. Once that is done, you can tone the muscles with subtle mists. Airbrush the crevices slightly darker and more orangey. Highlight the crowns of the muscles with a lighter, yellower flesh. If it gets too hard-looking and contrasty, no problem, just mist back over everything with the original flesh color. We pretend Oona is nude, misting her breasts a creamy white and even going slightly darker on the nipples. To help "warm her up" we add a couple drops of florescent pink to our main flesh and mist her buttocks. It helps her look flushed and radiant. Protect by sealing entire figure with clear Testor's Dull Cote ¨.
Well, there's really enough to talk about here for several pages. We suggest you lay off the coffee, get out your tiny brushes (Windsor Newton Series 7 are magnificent, tho expensive brushes). Look closely at the unretouched face photo we included with your kit and paint. There are no real shortcuts.
Doubtless, you noticed our slightly see-through, sparkly suit treatment. We took about an ounce of white and added a single drip of florescent pink. We used low-tack drafting tape to mask, and misted the suit until her flesh there was about 2/3rds covered. While the suit was still masked, we sprayed Testor's GLOSS Cote¨ over. Before it dried, we sprinkled glitter from a salt shaker high above. Sprinkle as high as you can reach . Then, pass the kit through the shower. Seal the glitter with more Gloss coat. It looks great. But you can make up your own special effect. That's what we most love about Oona - her character is so flexible. Whatever you decide, we hope you love it. Now, take a breather and just repeat process for the other leg.
Azimuth Design
P. O. Box 157
Equinunk, PA 18417
tel: 570.224.4081
email: arthouse@ptd.net
web: www.jamesart.com
Sand off all costume seam lines. Basically, she should look nude when you're done. Sculpt some boots...your design. Gloves if you want. Go to your local department or toy store and pick up a few el cheapo plastic toy do-dads for her utility belt. Consider mylar for the belt itself. The cape is the main addition. We made a cape for Superman once by dipping a piece of cloth into a pan of clear casting resin (hobby store). We draped it over a basic form shaped from carved styrofoam covered with polyethylene. It hardens good enough to apply auto-body putty for further contouring of the shapes.
Mounting: This is so-o-o-o-o-o cool! Drill a deep hole through her front toe. Drill it up at least an inch past the fragile ankle. Use epoxy, not cyanoacrylite (a.k.a. Super) glue to glue in a 3/16th inch diameter steel rod (yes - you will need that much strength!) Bury the steel rod into a base. This yields a completely unbelievable and dynamic effect! This one is our favorite.
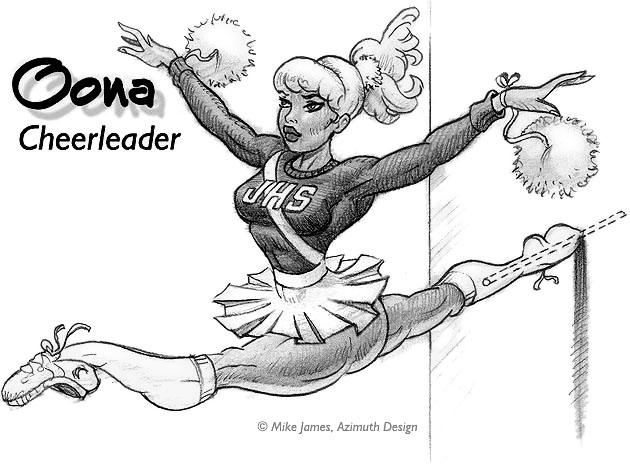
Believe it or not, we practically found this entire outfit in our local department store, including the shoes and the irridescent white pom poms! (They had an isle of doll clothing.) The skirt can be custom made with "wired" ribbon, which is cloth ribbon with tiny bendable wires hemmed into the edges. A neat sweater can be made by first painting the areas of the body the sweater covers the color you want, then spraying on Dull Cote lacquer and sprinkling colored flocking of a similar color while the lacquer is still wet. If you want a megaphone, simply use plastic sheeting rolled into a cone shape.
Mounting: We show Oona here shooting out of the wall (same trick for mounting SuperOona, but this time using a 3/16th inch "threaded" metal rod stuck deep into her leg.) There are threaded plastic or aluminum nuts that go into drywall. Basically, you install the drywall nut and just "screw" her into the wall.
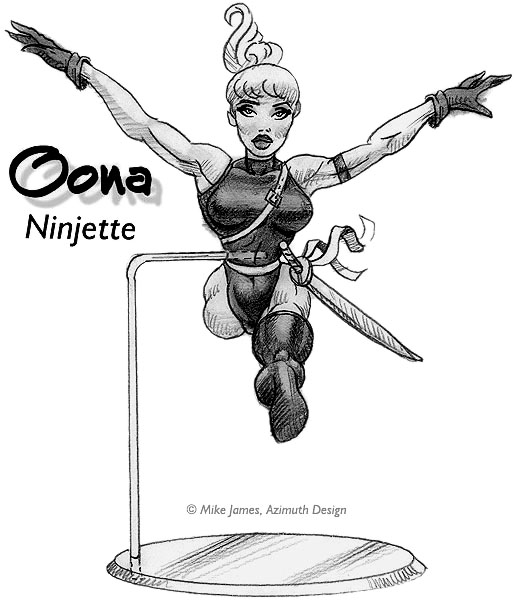
An easy modification. All you need to do is a little seam-sanding on the costume and the rest is additive. Sculpt some glove cuffs, or use an actual "donut" of sewed cloth. Then look around a hobby shop or toy store for a sword. If you don't find what you are looking for, try constructing one out of thin sheet plastic found in a lot of hobby stores. Use real ribbons (notions store). Get the kind with little wires in them so you can position them as flying.
Mounting: A 3/16th inch hole drilled in her right side at waist-height does minimal damage to the sculpture. It's also a pretty good balance point for the piece. (We know, that's how she was mounted when sculpted.) A vise-bent steel rod (plumbing supply) can be stuck into a drilled out piece of wood or metal. This makes for a nice, clean display. And from the left side, Oona looks like she's levitating!
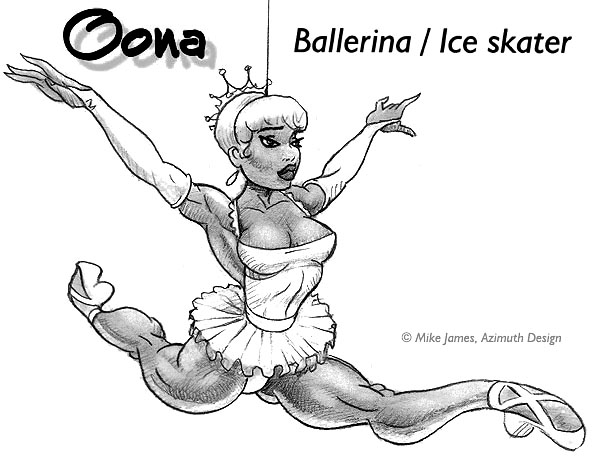
How beautiful is THIS?!!! And how easy! Basically, you're just leaving off the ponytail, filling that hole, adding a cloth skirt and painting on some elegant gloves! We even saw a little doll tiara in our local toy store that is a fabulous accent for this version of Oona. You can use teensy lacy ribbons for her shoulder straps. 1/4 inch white satin ribbons for her toe-shoes. For a skater version, it's easy to cut and grind ice skates from soft sheet aluminum, and it polishes easilly (seal with gloss cote). The skirt can be made with several layers of wired ribbon. Use a 1/4 inch white satin ribbon at the waist to hide messy glue-up. We think dressy pearl-drop earrings are a must. You can get teeny ones at a flower shop.
Mounting: Okay, you may think this a bit inelegant but it works and looks really great. 1/4 inch in front of her ponytail-post is Oona's center of gravity. Drill out a deep slot in the top of Oona's head at that point. A hole big enough to completely and deeply inset a tiny screw nut. Tie a piece of 50lb fishing line to the nut and sink it into the slot. Nothing should stick out but the fishline. With the nut in, stuff the hole with body putty. Retouch the hair and Whammy - an almost invisible method of hanging Oona from the ceiling! Don't worry about her turning on the wire, the kinetic action actually adds to the display.
Copyright © 1998 Mike James, Azimuth Design.
The Oona character, in whole or in part, likenesses thereof, storyline and all related materials are copyrighted
and registered intellectual property of Azimuth Design. All rights reserved, in any media.
Copyright © 1994-1997 Firefly Design.