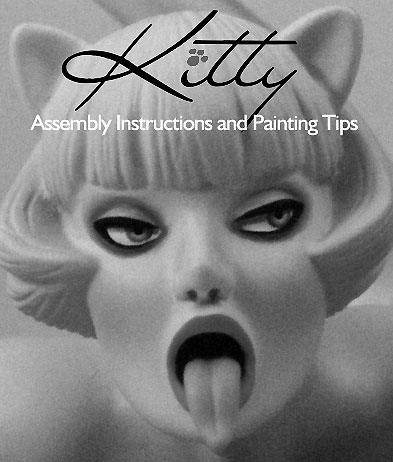
|
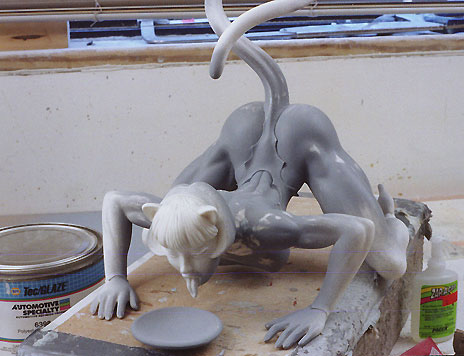
Cleaning and Prep Work
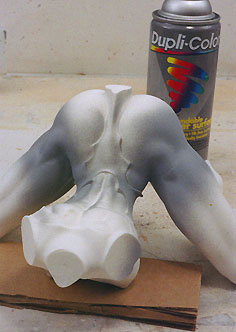
We know, it's a pain, but it's unavoidable. Before you begin assembly, you have to clean resin kit parts. This means trimming any remaining casting sprues and finning. (Actually, here at Azimuth Design, we hire someone to do the majority of this work for you). Look at each piece closely and putty and sand any pinholes, seams, or imperfections you may find. There are many hobby putties available for this, all expensive. We simply use an automotive body filler, specifically, NAPA Polyester Glazing Putty #6398. But we've also used common "Bondo"® automotive putty and it works like a charm too.
For finish sanding there is no need to "polish" the surface. 200 to 300 grit is fine.
I M P O R T A N T: After this, there is a crucial step. Mold release is used in the casting process, which bonds to the resin surface. This invisible release agent will not let any type of paint adhere to the the resin. It MUST be removed. We most recommend wiping each part well with lacquer thinner. But a good crevice-washing with a 50/50 mix of a lemon-scented dish detergent and lukewarm water also does the trick.
A S S E M B L Y
1. Pinning and gluing legs
Let the fun begin!
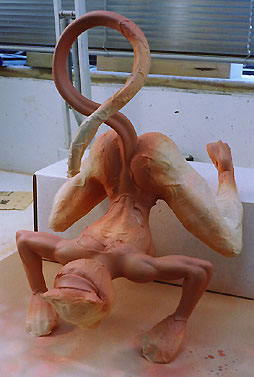
Generally speaking, on a resin kit, it's a good idea to get the major parts together first. For Kitty, that means getting those big powerful legs attached to that rather shapely torso. And it's also a good idea to "pin" large parts, especially on a big quarter scale kit like Kitty. Here's how to pin.
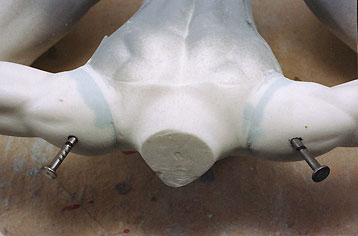
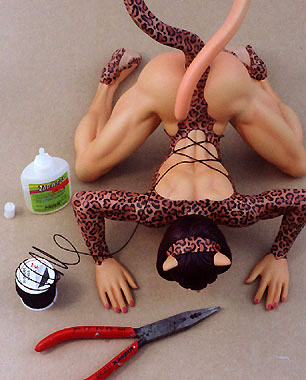
First, test fit the legs. It's key that the legs be precisely placed so that both lay flat, i.e. both knees and toes should be touching the same level surface. Place two thicknesses of corrogated cardboard under her breasts. (This is the height the breasts will be once the arms are attached.) Note that there are tiny scribed lines on the edge of the upper thighs on each leg that match little scribed lines on the torso. With the breasts on the cardboard platform, hold both legs into postion, noting precisely how each leg aligns.
Time to pin, one leg at a time. Pick out a pinning material. A common nail, with the head hacksawed off, will work. We opted for a de-headed 2 1/2-inch drywall screw. Drywall screws are really hard and stiff, too hard to hacksaw. To de-head a drywall screw, clamp the threaded shaft of the screw in a strong vise leaving a half inch or so sticking out. Give the head a single sharp whack with a hammer. It should snap off cleanly in one blow.
 |
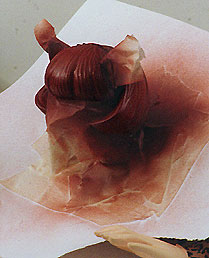
| Legs pinned into position. |
Drill a snug-fitting 1 1/2 inch deep receiving hole in the center of the leg flat and glue in the screw leaving an inch or so protruding. Next, drill a big sloppy hole into the torso flat to receive the protruding screw. (It should be sloppy so you can shift it around for exact positioning.) Test fit. Hog out the hole some more if necessary. Once satisfied, fill hole about 3/4ths with wet putty. Slop some putty on the threads of the screw also to assure good contact. Put about ten or twelve drops of cyanoacrylite glue (Super Glue, Crazy Glue) on the leg flat. And sqeeze the two parts together making SURE you are precisely aligned as per your test fit. Repeat proceedure for opposite leg.
Nothing but good 'ol fashioned patience and craftsmanship works for getting the leg seams to disappear. You want it absolutely seamless to the naked eye. Basically, it's putty, sand, and then spray with primer to check. Then putty any defects, sand, and prime again. About 3 or 4 repeats should do it. Lightly sand final prime coat.
 |
|
Check puttied seams with lacquer-based primer. Re-putty, sand and prime until seams become completely undetectable. |
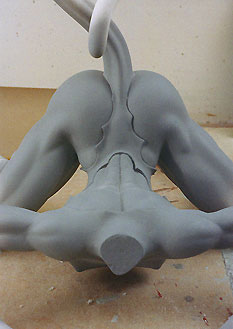
2. Pinning and gluing arms
This time we'll use nails instead of screws to pin, AFTER gluing. First, test fit the arms, with the two thicknesses of cardboard under the breasts and both legs laying completely flat. Scribed hash marks on shoulders assist in alignment. Position arms so that the palms of the hands lay flatly on the same level surface as the legs. Once you are confident of correct positioning, glue on each arm leaving the figure in crawling position.
For pinning, drill a hole, whose diameter is slightly larger than that of the nail, through the front surface of the shoulder, passing through the seam and into the back of the torso...about two inces deep should do it. Push a nail all the way in and mark the nail where it exits the resin. Hacksaw the nail about 3/16ths of an inch SHORTER than this so that once inserted, the nail is countersunk. Put glue on the nail (NOT in the hole!) and insert it fast, using another nail to countersink it quickly. When you putty the arm seam, fill the hole as well.
 |
|
Pinning the arms |
3. Pinning the tail
So as not to be redundant, we basically pinned the the tail in the same fashion as the legs, using small #4 finishing nails. Utilize scribed witness marks and photo reference to assist in alignment.
After this, it's a great time for some finish sanding because you can reach everything easily.
 |
|
Primed Body |
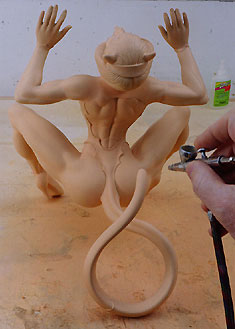
4. Pinning and gluing the head
Believe it or not, you're just about home on the assembly part. It's all been pretty staightforward so far, huh?
Well, time to glue that deliciously long tongue into Kitty's open mouth. You will not get a second try, so make sure you're looking straight on at Kitty's face as your gluing in the tongue so you're sure to get it lined up right.The bulbous part at the back of the tongue should cradel nicely into the lower con-cavity of her mouth providing a large surface for a good strong bond.
Like the legs, you should pin the head. (Jeez, you should be an expert by now!) We used a 1 1/2 inch drywall screw. Nice tight hole for the screw in the head part...big, sloppy, putty-filled hole for the torso connection, blah, blah, blah...you know the drill.
 |
|
With Head Attached |
 |
|
Fully Assembled Kitty, Primed |
Finally, sand and prime everything. Our favorite lacquer primer
is NAPA's Sandable, Light-grey.
P A I N T I N G
1. Mixing colors and Painting Flesh
Environment is key
First of all, always paint flesh in the daytime. Set up right in front of a big window that lets in lots of natural light. Because artifical light is almost never color correct: incandescents are too red, same with quartz, florescents too green and finding a balance is "iffy" at best. Nothing beats daylight.
There are a zillion ways to paint this kit but we'll restrict ourselves here to what we ourselves did. We decided beforehand on a leopard skin suit in reddish-brown. So, we figured a colorful tanned skin tone would look great against that. We start with about 2 ounces of Badger airbrush acrylic "Flesh", warming and darkening it with a squirt of red, brown and orange. We sprayed that color on white paper and took it outside to check in direct sunlight. Good darkness, but too red. We came back in and took the edge off with a few drops of blue and green.
 |
 |
|
Getting A Covering Basecoat |
Toning The Muscles |
It takes 4 coats to cover the figure solidly, but a grainy
surface has built up. To eliminate this, we dip our index finger
into the paint and "rub in" the final coat. Do a workable
patch at a time, rubbing in the paint, as it dries. The drying
slurry will be deposited in the crevices while sanding off high
points: the result is an almost glassy surface. To airbrush muscle
crevices, use a darker version of baseflesh, then lighten the
muscle crowns with straight Badger Flesh. We over-did the shading
on purpose and fixed by "misting" the kit all over with
basecoat. Seal now with Testors Dull Cote® and let dry OVERNIGHT.
2. Painting the face
We first airbrush soft-edged, pretty, rosy brick-red eyeshadow around the eyes. Then, using a nice tiny sable brush we line the eyelashes with straight black. Make a pleasing shape, thick on the outside, thinning the line as it approaches the nose. Dot the pupil holes black. Cleaning the brush really well, we use pure white on the eyeball. We picked green for her iris color. A light Lime disk, then darkening the outside rim of that with darker medium green. This creates translucence. Next we darken the top third of the eyeball, using light grey to shade the whites, the medium green to darken the iris.
For the lips we mixed a vivid pink-rose color using white,
red and florescent orange. We lightened the crowns of the lips
slightly. Thinning the color for the airbrush, we misted her cheeks
with the lip color, also hitting the eyeshadow a bit on the outside.
And a devilish inspiration...the tip of her tail.
Now, with darkened flesh, we dot the insides of her nostrils.
Making a thin wash of this color, we line the outside crevices
of the nostrils. A soft-edged lighter flesh drybrushed to the
bridge of the nose completes. Now seal work.
 |
|
Mix the lip color and the base flesh for a sexy, pink tongue coloration. Go slightly darker in the middle crease. |
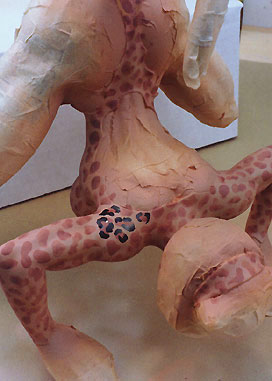
3. Painting a leopard suit
Time for the suit. Actually the tough part here is the masking.
Word is caution: Make absolutely SURE you have allowed a good
1/2 day for your last coat of sealer to dry thoroughly, you sure
don't want to be pulling up your work so far. Liquid friskets
are available and work great but are expensive. If you opt for
tape, try "drafting" tape (lower tack). If all you have
is painter's masking tape, press each piece on your t-shirt a
few times before pressing onto skin, the lint will help in removal
later. Cover ALL skin with tape. Protect face with a piece paper
and lay tape over it...(paint can bleed through just paper.)
For base-coloring the suit, we simply added a little bit of red-orange
and brown to our base flesh color. A light spray all over will
do, going a bit heavier on the edges, trying to leave the muscle
crowns just barely misted.
 |
|
Masked and Basecoated |
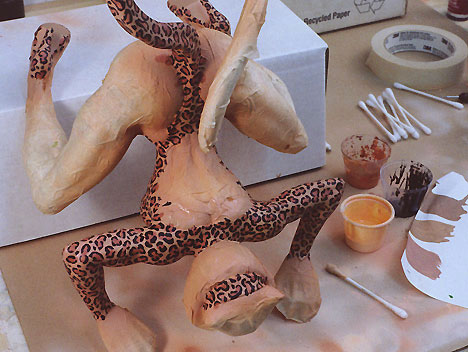
Patterning the suit:
We think you're gonna be surprised how fast the patterning goes. We take a medium brick red and with a Q-Tip®, dab little shapes all over the suit randomly. Don't load up the Q-Tip so it's drippy, in fact sqeeze a little out before application. One Q-Tip was good for about 15 dots. Don't forget the shoes and headband.
Next, take staight Black and with a brush, squiggle in little dots and crescent shapes around our Q-tipped brown dots. It's good to have reference for this, we found a picture of a cheeta. Or you can just look at what we did here...it's not rocket science. We referenced the first 5 shapes or so, got the idea, and never checked reference again. It took us about 2 hours to do the black on the whole suit, but it was fun, and rewarding.
 |
|
Q-tip brick-red dots, black shapes around. |
You don't have to do this, but we did, cuz we're fussy. We took dark grey on our sable brush and highlighted the black where it was on the crowns of the muscles. This got back some dimention. Then we airbrushed darker brick-red in crevices, like the crease in her belly. Of course this made the black lighter so we re-did those areas solid black again. Finally, with a little lighter flesh on our sable brush we drybrushed highlights on the stretchy folds between her breasts and around her waist.
 |
|
Leopard suit painting complete. Sealed with Testors Dull Cote®. Dried overnight. |
 |
|
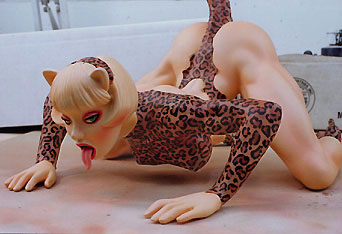
Leopard suit unmasked. |
4. Painting Kitty's hair
We must admit, it was almost a shame to see Kitty's "blondish" lhair go, but we had decided early on that Azimuth Design had quite a few blondes on the roster already and Kitty was going to be brunette.
For that, we mask off her hair as shown at right. Here's a valuble tip for when you want a "crisp" edge between sharply contrasting colors (like light skin and dark hair). Only the first coat bleeds under tape cracks. So, instead of immediately spraying the dark color, hit the edges first with the underlying skin color and let that dry. That way, any bleeding will be the color of the skin and almost invisible. The subsequent dark color will not bleed under the tape now because those hairline tape crevices are sealed.
For base hair color we use brick red. 2 or 3 light coats did the job. Next we made a thick-ish wash of solid black and with a big sable brush painted it over the hair quickly. The watery black falls into the crevices, leaving the brick-red on the high points. We twist the figure around so the black has a chance to flow into all crevices evenly. Then, seal with Dull Cote® and un-mask.
 |
|
Masked and base-coated hair. |
5. Finishing touches
After the hair masking comes off, it's time to get out the small brush and do some clean-up and detailing. We went around the suit and sharpened-up some ragged edges. We also darkened sharp crevices like where the legs creased the tummy and in between the fingers.
We used the lip color to paint her fingernails. A slightly lighter stripe down the middle of each nail added dimention.
Another really fun thing to do was bring out the high gloss varnish (we used Liquitex Gloss Medium) and coat her eyeballs, lips , tongue, and fingernails. The shiney sparkle really adds a kick.
We included a length of wire thread with your kit for lacing up the back of her costume. It's not very difficult. Cleanly cut the end with sharp wire clippers, dot the end with Cyanoacrylite glue and lay it inside one of the lower points on her suit. Once set, stretch to connecting point and bend a kink in the wire there with an exacto blade. That shows you precisely where to cut. Then, simply glue down that end. Repeat, one string at a time in the double "X" pattern shown at right.
 |
|
Wire thread is included in the kit for suit lacing. |
6. Painting the saucer
And last, but not least (to Kitty) is her little milk saucer. We'll assume you cleaned, bathed, and primed it when you did the other parts. Painting it is pretty simple. Just put a couple drops of brown and a very tiny half-drop of yellow into a thimble-full of white and airbrush both sides. Seal with Testors GLOSS Cote®. Let dry a half hour or so.
We put on a classic navy-blue stripe. Testor's has a line of pens they call "Paint Markers" for purposes such as this. Their Gloss Blue #2511C at $2.40 is perfect. But for just painting a single line? ... well, we're not running out to buy one for a single line. We must have 5 sets of colored Markers here already, Pantone, Magic Markers, you name it. We used a pointy-tipped dark blue Prismacolor marker.
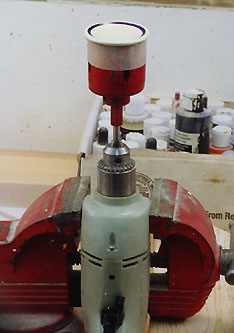
"Freehanding" a clean cicle is next to impossible. To make a nice circle, all you need is something that spins, a record player, baking mixmaster, something where you can attach the plate and control the speed. We used a drill with a hole-saw attachment. We put a piece of masking tape sticking up over the saw's cutting teeth to hold the plate in position and also not scar the paint. We just duct-taped down the variable-speed trigger to the speed we wanted and carefully brought the marker close until it touched. Moving marker in and then out to the edge gave us the width of band we wanted.
 |
|
Vise, drill, & hole-saw bit for putting stripe on the plate. |
7. Painting the ID tag
Finally, we painted her pet tag solid Black. After that dried, Metallic Gold was carefully drybrushed to just the upper surface, leaving black in the depressions. We included a cord as a tag collar, but if you want a really jazzy one, like we have in the pics, check out the jewelry section for teen girls at almost any clothing store. They have beautiful, very tiny chains for just a few bucks.
Well....can you believe it, you're done! You have a beautiful feline to take care of now. Enjoy your new pet...and give her back a scratch, once in a while.
Copyright © 1999  Mike James, Azimuth Design.
The Kitty character, likenesses thereof, storyline and all related materials are copyrighted
and registered intellectual property of Azimuth Design. All rights reserved, in any media.
Copyright © 1994-1997 Firefly Design.