|
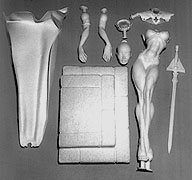
Check the picture and list to make sure you have everything.
Also there should be a real hair wig And a packet of little jewels for the crown and sword. |
|
Before grinding off casting sprues and finning, please note: Do not cut off the pencil-sized peg coming out of Guinevere's front foot! This is a support peg that fits into the hole in the stone base, crucial to the structural integrity of the piece. Grind down remaining casting sprues. Putty any seams or pinholes you find. (On some kits you may notice some light blue spots. This is where we did some prep work for you, and puttied some of the more visible casting anomolies.) When you are satisfied that each piece is defect-free and sanded to perfection you must bath all parts. This is an important step, there is mold release on the surface that you cannot see, smell or feel. It will prevent any paint from sticking to the resin. We recommend rubbing alcohol, lacquer thinner, or just plain old warm (not hot) soapy water. Lemon-scented dish detergent also works good.
We've tried to make things very easy for you. You'll notice that the only seams requiring puttying are the arms (and maybe the neck for you fussy builders). All other parts have natural seams. First, temporarilly stand "Gwen" up on her stone base, inserting the foot peg into the base hole. There is purposefully a lot of play here, but try to hold her upright and correctly-facing front.
Arms: First, the easy one. Test-fit the RIGHT arm, checking with reference photos. The shoulder-seams should line up both front and back. The forearm should fall into that hollow between her jutting hip and her buttock, and the right hand should cup her right thigh nicely. Make note of this position and remove arm. Put a dab of cyanoacrylite glue (Super-glue, Crazy glue) on the shoulder flat and a drip on the palm of her hand and glue the arm on. You may drill the shoulder and countersink a finishing nail to add stength if you like, (see left drawing below). Putty the drill-hole.
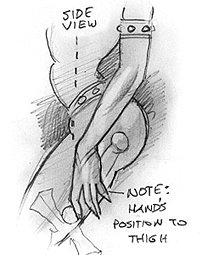
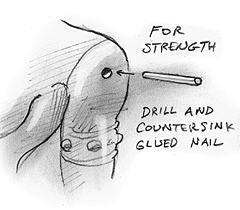
Finding the position of the LEFT arm is a 2-hand job. The left arm should be test-fitted while holding the sword in position too. Check color reference pics. The top of the little ball above the "T" part if the sword should just touch her first finger. See color reference pics for where sword TIP falls. Rotate the sword so that the "T" part of the sword comes within about 3/16th inch from touching her leg. Now make note of the hand's position - from the SIDE view Pic C, you'll note that it is positioned toward the back of her thigh. Revove and glue shoulder flat (do not yet glue sword to her hand!) It's a good idea to pin this shoulder for strength with a head-removed, countersunk, #4 finishing nail, see right drawing above.
Next is fitting what we call the CARAPACE, or shoulder armor. All you need to know here is that the cross cut-out faces front. The piece should fit very nearly air-tight, with the top of the studded neck-ring fitting level with the neck flat of the body. If for some reason the carapace doesn't seat properly, check to see if there is a little resin pimple or something on the underside causing the gap. Once fitting snugly, simply glue the armor on.
Now the HEAD. You can drill out holes in both neck-flats and insert a pin for strength if you like. If not, your job's even easier. Just spread some glue on the two flats and glue into position. Her head should face directly front with her lips centered directly over the carapace cross.
Wow, can you believe it? Assembly is already done! You don't have to glue the sword to her hand, or her feet to the base, untill AFTER painting. As for those of you who purchased the cape, We suggest you NEVER glue the cape on. It was designed to key-lock to her carapace behind the wig, allowing for removal. After all, we don't want to deny anyone the small pleasure of removing the cape to take unobstructed peek at Gwen's beautiful bare derriere.
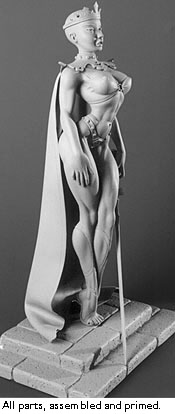
As with all resin kits, this kit must be PRIMED before painting. We will assume you have given Gwen a good bath to remove mold release. If not...last chance. For either acrylics, enamels or lacquer-based paints, a primer coat will seal the resin and prevent leaching oils from ruining you paint job in years to come. Any light-grey sandable spray primer will do, see photo. We recommend NAPAs (available at NAPA Auto Parts Store) Light Grey Primer #7865. It is cheap, goes on smooth, dries almost instantly, is light is color, and sands like a dream. One spray can is more than enough. One coat if fine, just enough to cover, no more, or detail may be lost.
It's always a good idea to paint flesh colors in daylight. It becomes a MUST when your kit is exposing as much flesh as sweet Gwen here. We suggest setting up a table at a big, bright window.
There are many pre-mix "flesh" colors out there, and frankly, most stink. They are variations on tan, which is brown and white, and look like dirt unless doctored. We recommend making your own flesh. Lots of white, smaller and equal amouts of pink and that dirt color called flesh. To this, add some drops of straight orange, and a couple of yellow. This renders a knockout "peachy" color that brims with life, very fresh and ingenue. If it looks too harsh, add white and a drop of lime green. Never, ever, darken a light color with black.
We've seen fleshtones applied superbly with a brush. But oil paints were used, which can be blended well. Blending is the key, and if you are using water-based paints, there is really only one way to go, airbrush. If you regularly build kits and don't have an airbrush, get one. They are pretty cheap nowadays and really fun.
To start, take your custom flesh color and airbrush all flesh areas solidly. Several light coats are always better than 2 heavy coats. Here is a little tip for the final base coat. Sometimes spraying several coats of acrylics will build a "tooth" to the surface. So, for final base coating, we dip a Q-tip or sometimes even our finger into the color and "rub in" the last coat. Do small patches at a time. Just keep rubbing the paint in until it begins to dry. What happens is that the paint becomes a thick slurry. This slurry is deposited into crevices and micro pinholes, while simultaneously sanding off the grainy top surface. The finish surface is almost glassy smooth, a perfect surface for detailing!
Now for toning. Make a slightly darker, orangey version of your color, and also a lighter version (double the white). Lightly mist the muscle crevices with the darker version. Lightly mist the crowns of the muscles with the lighter version. If you go too far and there is too much contrast, no problem, just evenly mist the original flesh color back over all the flesh. Finally, we mist a darker, orangy/rose tonation to the apples of her cheeks and buttocks to give them a flushed look. We mix a yellow-ey, creamy white color and spray the globes of her breasts, assuming of course they don't see quite as much sun.
Check your colors in sunlight outdoors. You may wish to modify the original base color and mist her all over to soften further. Once fully satisfied, seal and protect by spraying the figure with two light coats of Testor's Dull Cote.
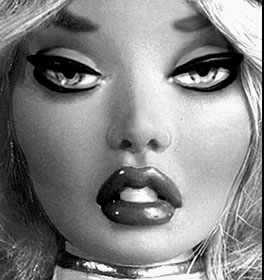
This could well be one of the most important aspects of the kit. Gwen HAS to look beautiful, maybe a little ferel, but above all, fetching, see photo. So let's do good work on her face.
Eyes: Airbrush a darker brick orange color around the outside her eyelashes, wider on the outside corners, tighter on the inside corners. (See Face Close-up, color reference pic.) Go back and use the original flesh base color on the eyelids. This will make it look like her eyelids are catching light from above. Brush on straight black to the front surfaces only of the eyelashes. With black still on your brush, fill in the drilled holes of her pupils.
Then paint the whole surface of the actual eyeball white (except the black pupil). Decide on an eye color. Paint a very light version of it for the iris, Then, outline the iris edges with a darker version of the same color. This will make her iris look glassy and transparent. Finally, paint the top 1/4th of the whites with a very light grey so it appears that her eyelashes have real dimention and are casting a shadow onto the eyeballs. You can also darken the top third of her irises.
Lips:
Create a color that makes her lips practically scream to be kissed. Mix up a small batch of a pretty deep rose - leaning a bit to the "candy" side is good. (For extra candy-like suculence, we added a few drops of florescent pink). Give her lips (and fingernails) a covering coat or 2 of this color. Now, pour out a few drops of the lip color onto a plate and add a drop or two of red to darken. Brush in teeny little lines to the lip crevices. Lighten the original lip color and round up her lower lip with a soft highlight.
Misc:
A nice light orangy brown is good for her eyebrows. Also use this color to dot the insides of her nostrils, and deeper areas of the ears. Once satisfied with the face, seal with Dull Cote. Once that's fully dry you can brush an ultra-glossy clear-coat (we use Liquitex Gloss Medium) on just the lips and eyeballs. This kicker gives her a really wet, dreamy look. Just flood on a thick, but non-dripping coat, and leave it alone. The natural puddling action of the Gloss Medium is key to it's final gloss, fussing with it kills it.
It's hard to tell from our color reference pics, but the color we created for her clothing is actually holographic! That is, as you turn the sculpture, it changes color, like a rainbow. To create it, we mixed 2 colors of fingernail polish - yup, fingernail polish! (see pic of nail polish) For you guys who don't hang out much at the "beauty" section of K-mart, you don't know what you're missing - the fingernail colors there are more varied and "special-effecty" than anything you'll EVER find in the modeling stores. Fingernail polish is simply lacquer paint with a little perfume thrown in. We chose one bottle of Revlon's "Iced Silver" and a bottle of Crytalic's "Wet and Wild" holographic polish.
First, we let the kit flesh colors dry real good overnight. You sure as heck don't want to be pealing the previous day's work. We masked off the figure's skin to reveal only the suit, utilizing a very low tack "drafting" tape (it's possible to use "masking" tape, but first take most of the glue off by pressing in on your t-shirt a few times). With an exacto knife and fresh blades, cut around the contours of the tape. Once done, we sprayed all with white to provide a bright base under-color. Remember the cape, crown and sword too.
After all is covered solid white you get out your nail polish. We just emptied both colors into a small glass cup (lacquer melts plastic and will dissolve the wax in paper cups). Then we thinned the polish with a lot of lacquer thinner almost doubling the volume. You have to keep this stuff freshly stirred every couple minutes becase the colored powder sinks fast. We loaded the airbrush. All you really need is a few light overall coats to get the holographic effect, plus you don't want to kill the white.
There is no need to seal, lacquer paint is it's own seal. Just remove the masking. Big Tip: If the tape starts to feel like it's really stuck, stop, and heat area with a blow dryer. The glue will soften it's grip. You can further assist removal by re-scoring the edges with a fresh X-acto blade.
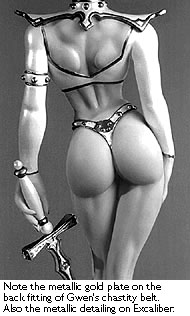
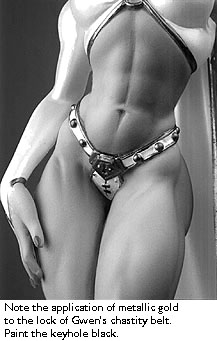
Here comes the part that just makes this piece sing, the gold lining on the different parts, see photo. We highly recommend using the expensive gold paint. The kind that comes in little 4 ounce cans titled "Gold Leaf" Pale Light. It's got a LOT of bronze powder in it already, but we add a little more. Check the reference photos. Use a small sable brush. We stood Gwen up on her base to do a lot of the figure work. Other pieces were left loose.
All chastity belt studs get painted. Carefully line the outside edges of the belt and coat the entire lock on the front and those two tiny metal "stitches" at her crotch. For the bangle on her arm, do the edging and studs. Line all edges of her little decollette-cut, bolero-style top. Don't forget the ring between her breasts and the "V'"-shapes on her hands. All edges of her carapace get lined as well as the neck studs. Do all edges of her crown and cape. Note the little "fleur de le" pattern at the corners of the cape. Find the edging on the sword you wish to make look "bronzy" but save the actual blade for spraying silver. After the gold is completed is a good time to do the blade. Now, just give your gold paint a few hors to dry good. Even a full day is good.
Jewels: Each kit comes with some cool glass beads and pearls. There is large pearl bead and a tiny silver pin for the end of the sword handle. Carefully drill a tiny receiving hole for the pin. Spear the pearl with the pin and glue pin into the hole. Two of the colored jewels get glued onto either end of the sword hasp. The other two colored jewels fit in that little decorative space about an 8th of the way down the blade. We put three clear uncolored jewels on her crown sepated by tiny pearl beads (see color pics).
Compared to the fussy techniques used so far, painting the stone base is a buttload of expressionistic fun. First, clear the area, cuz this is gonna be messy. Make sure all your previously painted pieces are on the other side of the room, well out of harms way.
Using acrylics, mix up a light warm grey and coat the entire base, top, bottom, and sides. Once dry, mix a light cream color. Dip a toothbrush into this cream color and flick the bristles back with your finger a few times againt a piece of scrap cardboard to remove the "too-big" splatters.
Once the flicking makes the dots are smaller, flick-slatter all sides of the base evenly. Now mix a color a bit darker than the original base color. Flick-splatter the base with that color. For a bit of variation, you may wish to flick a few drips of a more pinky color. (We did this to bring some of her flesh tones into the stone. It helps pull thre piece together.)
Using the darker splatter color and a tiny brush, draw in a few random cracks. If things look a little stark, or you think your colors are too contrasty, just mist back entire base with your original base color. Now, using the darker grey color simply brush in the grout seams.
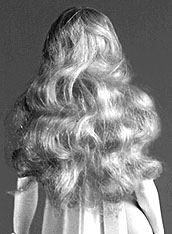
These wigs are hand sewn with the best doll hair we could find. We've carefully sewn it to a dome-shaped cloth to eliminate the tedious job of the time-consuming plug-by-plug attachment method.
Test fit - making sure part goes down the center of her head, also making sure front of the wig is positioned corectly height-wise (determining her forehead height is important). Now, hot-glue crown to scalp by completly covering the cloth part of the wig with a THIN layer of hot-melt glue. Press down and hold firmly till glue cools (about a minute). If you want to play around, like we did, you can do a little trimming on the top of the wig. We cut out tiny sections of hair and and brushed neighboring hair over to give her a less "poofy" look. No need to fool with the tresses yet, "styling" them can be done later.
The next step is best as a 2-person job. Have someone pull her hair down tightly to the top of her head and remain pulling it down until the very end of this process. Make sure the part is straight. While holding, soak the top of the wig with hair spray to hold flattening. Blow dry. Still holding hair down, test-fit the crown- it should be snug. Make a mental note of where it hits her hair. Remove the crown and lay it aside. While your partner is still holding, take a tiny wire and loop it around her head where you recall the lower edge of the crown hit. Twist the ends tightly at the back of her head. Another blast of hair spray and blow dry. Now, your partner can let go. There will probably be a bit of spring-back, but the idea is to keep the hair as tight against the head as possible. Now you can spot-glue the crown to the wire.
We do NOT recommend brushing or combing- this just makes a frizzy mess. Most styling can be done by simply positioning sections of hair with your fingers and holding that position with a small squirt of hairspray, blowing dry, see photo. We think the best effect is the have the fullest area around the shoulders thinning as it falls down the back. To keep hair from poofing out too much at the bottom, we reached underneath in the hidden area and trimmed away some sprigs. Most important is arranging some nice swirls around her face to frame it nicely, see photo. The hair has a beautiful natural curl to it already, so very little styling is actually needed. It may seem awkward for folks used to chiselinghard resin, but play around for a few minutes until you get the feel, and you will soon find that a small adjustment here and there makes a world of difference. Also, the literature we received on this hair says it takes to "crimping". So, if you'd like to get out a hot "crimping" iron and try those tight little zig-zaggy waves take the plunge. You can clip a long sprig off the underside of her hair to practice on.
This is a little tricky as 3 things have to fit correctly - a second set of hands is handy. Test fit first - put Gwen's foot peg into the base-hole. For those of you who purchased the cape, put that on. Then get the sword and place it in her hand. The play in the foot peg holeis purposeful and allows you to make adjustments in order to place the cape and sword accurately.
The cape should key into the carapace notch at the top, and lie flat on the base at the bottom.The thick part of the sword handle should hit her palm. One "T" of the hasp should come within 3/16 inch from her leg, and the sword tip should hit the first step (refer to color photos).
Wiggle the 3 items around until all parts seems to fit well. Also make sure the figure is straight vertical from BOTH the front AND the side. Study carefully. Make mental note of figure's position.
Now remove the figure. Glue up her foot peg with a lot of glue and place it in the hole. Quickly return the cape and sword to their former positions and hold all firmly in position while your partner squirts the foot peg hole with glue "kicker" to speed setting. If you're alone.... just be patient, hold the pieces together a few minutes while the glue sets. Once the figure is set, you canthen glue the sword to her hand. Scaping a clear spot to resin on both the handle and her palm helps get a really good bond . A tiny scrape on the sword tip and where it hits the stone will make a good resin-to-resin bond here too. Just a teeny drip will do. You can retouch later.
We suggest you do NOT glue on Guinevere's cape. The cape maintains it's position pretty well without glue, and the ability to remove it and give a little extra surprise to a viewer, is a really nice option.
Well,...Gwen's done! We hope you enjoy the fruits of your labor. Please take good care of this regal lady or Arthur may pay a visit and cut you down to size.
© "Guinevere"
1999 Mike James,
Azimuth Design.
All rights reserved.
Copyright © 1999 Mike James, Azimuth Design.
The Guinevere character, in part or in whole, likenesses thereof, storyline and all related materials are copyrighted
and registered intellectual property of Azimuth Design. All rights reserved, in any media.
Copyright © 1994-1997 Firefly Design.