
|
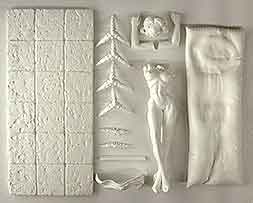 |
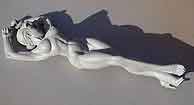
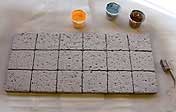
![]() Cleaning the Parts
Cleaning the Parts
We do a lot of the kit cleaning for you, before we put the kit in the box, so this shouldn't take long. Grind off any remaining casting sprue nubs, any residual "finning" you may see. Inspect the resin parts carefully. Putty and sand any pinholes you may find on the figure parts, the cloth, and the large pillow. (The other parts do not matter so much, pinholes there are okay to leave, as these parts are to looked aged anyway.)
When you have most of these visible imperfections taken care of, it's time to degrease the kit of mold release agent (otherwise paint won't stick). We recommend a thorough scrubbing of all resin parts with either rubbing alcohol or lacquer thinner. Or even just body-temperature water (NOT hot water!) and dish detergent. Get into all crevices.
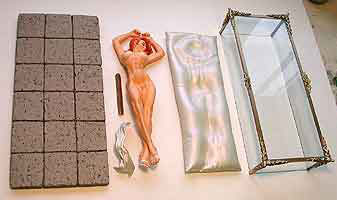
![]() Assembly
Assembly
Attaching the head and arms
First, test fit the 4 "figure parts" by laying her in her comfy pillow. You will notice that she snuggles right into the indentations naturally. We're actually using the pillow to determine proper arm and head location. Remove the arms and lay aside. Put cyanoacrylite glue (Super Glue, Krazy Glue, or Zap-a-Gap) on the neck flat oif the head part. Cement the head to the body using pillow as natural guide. (Use only enough glue to weld part, not enough to drip onto pillow.) Once set, do each arm the same way, one at a time.
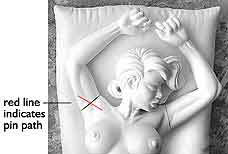
![]() Pinning
Pinning
At this point, we recommend you "pin" the arms for added strength. It is a relatively easy matter. Using a drill bit slightly larger in diameter than the finishing nails provided, drill a hole sideways (see red line on photo above) from under the arm, passing through the glued flat, and into the body piece. Test fit, by sliding a nail into hole. Now, mark on nail where excess of nail sticks out. This is "about" where you'll cut off the nail....actually, subtract a bit more, so that nail is "countersunk" once glued in. Once cut to length, put cyanoacrylite glue on nail (DON'T put glue in hole, or the nail may freeze halfway in). Now, in one QUICK move, shove nail in ALL the way, and QUICKLY tap it in BELOW the resin surface. Repeat process with other arm.
In building our very first kit for purposes of writing these instructions, we accidentally snapped off one of her delicate heels...hey, nobody's perfect. When tht happened, we decided to replace both heels altogether, using finishing nails. (Nails provided with kit). The cool thing is that the finishing nail heads make perfect little end-caps to the heels. Now...You don't HAVE to do this process if your not the clumsy type like we are, but it may not be a bad idea, in order to make these delicate parts virtually impervious to future manhandling. Here's how...
 |
 |
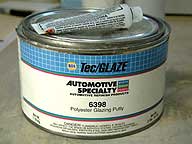
Randomly snap off existing resin heels, and lay those heel parts aside for future reference. Using same drill bit as used for the arm pinning, carefully drill into heels, making sure not to drill too far (as to exit the top of her heel.) Also, make doubly sure you are not drilling in at a slant. Viewed from the back, the drill bit should "bisect" the soles into two equal halves. Viewed from the side the bit should go in PERPENDICULAR to the soles of her feet. After holes are drilled, test fit nail, and clip it off to proper length, useing your snapped-off resin heels as referrenc for length...the exposed nail length should match the brpken off resin length. (A "witness mark" on the nail, where it enters the resin heel is not a bad safety measure). Once proper nail length is achieved, put glue on nail and quickly slide into place. Then, simply putty the nail to taper it properly, and mimmic shape of old resin heel. For putty we recommend NAPA's, Tec/GLAZE #6398, Polyester Glazing Putty, found in any NAPA auto parts store. (picture above).
![]() Final Prep
Final Prep
Putty and sand all seams of attachment as best you can. Once that
is done, your figure is now fully assembled and ready for final
detailing. Find a good, light grey, SANDABLE automotive primer,
like Dupli-Color (can shown below). Primer is great because it
does 3 things at once. One, it seals away the oils of the resin
and keeps those oils from leaching into your colors later, thereby
discoloring the paint job. Two, it lets you see those imperfections
you might have missed, very easilly. And Three, it's not like
other paints...it's designed to be a "filler", loading
up pinholes. When you let it dry and then lighly sand your work
becomes amazingly smooth, almost glassy. You can even buff Primer
to a glassy shine, but that's not really helpful or necessary.
So, spray two light, but covering coats on the fully assembled
figure. (By the way, at this time, we also primed the other resin
parts, but found no anomalies to putty.)
 |
 |
Putty and sand any visible imperfections you might find in the figure (picture of primed figure above.) We'll bet you'll discover that what you thought was "perfect" arm-seam puttying was not so perfect after all. That's okay, it's part of the process of craftsmanship. Just sand the seams again and re-putty just the imperfections. Then a little blast of the primer to check seam again. More imperfections? Just sand and repeat....THIS is how you get a kit absolutely seamless. If you've never done it before, we think you'll find the process rather rewarding. Once ALL imperfections are eliminated, do a final very light primer coat, just enough to hide your work,. And then, very lightly sand with super fine 320 or 400 grit sandpaper. Just enough to take the "tooth" off the primer, not enough to sand through it. That done, she'll feel like warm smooth satin in your hands now. This sensuous "tactile" aspect is one of sculpture's most amazing qualities.
Now, we're ready to paint.
Painting the Figure
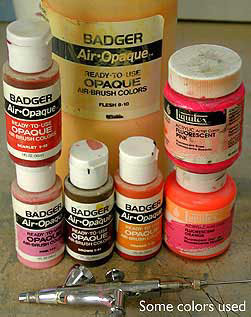
![]() Base Painting Figure
Base Painting Figure
It's always a good idea to paint flesh colors in daylight. It
becomes a MUST when your kit is exposing as much flesh as Sleeping
Beauty here. We suggest setting up a table at a big, bright window.
There are many brands of bottled, so-called "flesh"
colors out there, but they usually look like mud, or some lifeless
variation of Tan. The only Flesh we've seen that has any life
to it is Badger's Air Opaque (big bottle in picture below).But
even that is a tinge too yellow, so we pour out a few ounces and
doctor it with pink mostly. If you're starting from scratch, for
caucasion flesh, use lots of white, smaller and equal amounts
of pink and brown .To this, add some drops of straight orange,
and a couple of yellow. This renders a knockout "peachy"
color that brims with life, very fresh, ingenue and lovely. Test
it by brushing a patch of the color onto white paper. (And if
patience is not your long suit, dry with a hair dryer). Light
colors like caucasion flesh alway dry darker. Conversely, dark
colors often dry lighter thanwhen in wet form. If you think your
flesh color looks too harsh, add white and a drop of lime green
to take the edge off. Never, EVER, darken a light color with black.
If you want your flesh darker, use brown. We recommend "airbrushing"
on skin tones for a smooth satiny finish.
![]() Toning the Body
Toning the Body
Mix a slightly darker flesh color, and carefully spray
that into the depressions of her muscles. Next, add white and
a drop of yellow to your original base-coat flesh, and
hit the high points of her muscles with that to lighten them.
Don't worry about over-doing this muscle-defining effect...you
can always mist the kit all over again with the original base
color to soften the effect. In fact, we purposefully go just a
little bit overboard with muscle toning, and mist over all with
original base flesh. At this time, we mix up a slighty darker,
but very colorful, orangey-pink, using a healthy drip of the florescent
pink shown above and a few drips of orange. With that in the airbrush,
we mist a "blush" to her cheeks...both sets...facial
and derreirre. It makes her look warm, fresh and flushed...very
sweet almost as if she's blushing. Once we have her body flesh
looking soft and lovely, we seal our work (for protection) with
two, light covering coats of "Testors Dull Cote"®
Lacquer. Testor's Dull Cote, found in little spray can at most
hobby shops is a SUPER product, we cannot recommend it enough.
Use it after you've finished certain areas and they are proteted
like iron. And it paints over easilly.
![]() Painting the Face
Painting the Face
A little considered thought is good here, before you actually
begin painting her face. For instance, you should decide now what
color her hair will be. What color will the pillow be? You want
her eyeshadow and lip color to fit well with these colors. For
this build-up you see here, we already knew we wanted a pearly
white pillow, we thought that would make her look super-special,
like a "jewel". That's kind of thr point of the kit...you
want her looking almost like an apparition, or angel. And, we
thought a pretty, strawberry hair coloration would make her to
look light and airy, but colorful, like a field flower in springtime.
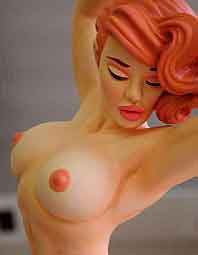
So with this "pastel" color theme in mind, we kept her make-up colors light and colorful as well. Light lavender-pink eyeshadow and bright, pink lips (a bit of the "Florescent pink" employed there). This light colorful palette set off her pitch-black lashes. We used a muted brick-red for her eyebrows. We dotted the insides of her nostrils and deeper depressions of her exposed ear with a darker, redder, flesh. We lined the crevices of her ear with lighter versions of this color. (The ear is important to paint well, since it is so visible.) Once satisfied, we seal and protect the face work with Dull Cote.
![]() Painting the Hair
Painting the Hair
We stopped work when the sun went down. We left the figure propped
up at a 45 degree angle overnight so that the only areas touching
anything were her heel nails, and back of her hair (as yet, both
unfinished areas). This overnight delay is actually a very GOOD
thing. It allows the many underlying coats on the flesh to get
really good and dry, and able to stand up to the next day's handling.
Typically, we spread out painting a kit into 2 or 3 days. It's
smart not to rush things and take breaks for several reasons.
First, it gives you perspective, you'll se things coming back
fresh to a kit that you missed staring at it for hours. Second,
it allows your underpainting the time it needs to harden really
well. As a side note though, DON'T make the mistake of "heating"
the kit overnight to assist in this drying. You never let resin
to get too hot, oils can begin to leach out.
Now, on day 2, we begin with her hair. We decide not to "mask off" the hair because in the flesh color r, it is now, is actually not too far from what we want. So, we're just gong to hand-brush tint that with a wash.We start with a thinned wash of pinkish tan, purposefully letting it puddle into the crevices for darker definition there. As we apply, we twist the figure around, and upside down, careful not to let drips run onto her finished skin. But if it does, it's okay, just wipe off. That's the beauty of thee protective lacquer coat...it let's you do that.
Next we lighten the crowns of the hair strands with a lighter, more opaque, pinky flesh. This completes our base coloration. Now, with a finer red sable brush (we highly recommend Windsor Newton's) we hand paint delicate detail hair lines, not all over, just here and there on the crown strands that would catch highlights. Finally, seal work with dull cote.
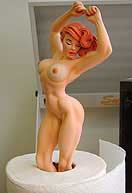
![]() Body, Detailing the Shoes
Body, Detailing the Shoes
With a slightly darker flesh on our little sable brush we
then go around the figure lining hard creases. Like the verticle
crease of her stomach, her navel, the underside of her breasts,
her crotch, the crack of her buttocks, the crease in her spine,
her armpits, in between her fingers and toes, where her ankles
touch...basically any place where you'd expect light to have a
hard time getting to.
Next we do the shoes.
We brush-paint them carefully, with Opaque white... two coats.
Note: Leave the little depressions in between the arcs of the
lacy back straps, flesh color, as if holes in the material. After
the white, we paint over shoes again by hand-brush with a translucent
pearl white. (Note: we actually made our OWN pearl color..see
the two ingerients we used in the "Pillow and loincloth"
section below.) Two coats on the shoes gives them a beautiful
gem-like iridescence, almost like Cinderella's glass slippers...hmm...
that too, is not a bad idea.
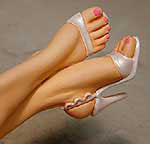
Finally, the toenails and fingernails. We painted ours the same pretty, pink color as her lips, so she "matches".... Beauty is starting to look reeeeally special now. Last step is to seal the entire figure with Dull Coat. After that, we took a brush and dabbed a super-shiney Gloss Cote to her lips and nails. and shoes. Whammo, she's done! Whew, what a heartbreaker!
Painting the Base
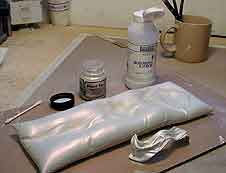
![]() The Pillow and Loincloth
The Pillow and Loincloth
As the saying goes "Less is more". We decide to
let Beauty herself be the main color element and downplay the
other elements. Also we don't want to interject too many colors
so as to fight for attention with her. So we decide both her pillow
and loincloth should match her pretty, white, iridescent shoes.
Also, this will add an luxurious effect, almost like she's being
carressed by, or drowning in, creamy, liquid pearls.
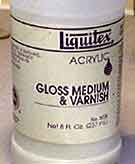
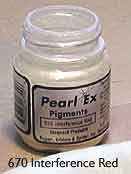
First off, we spray the pillow and loincloth solid white...it takes 3 blow-dried coats to get there. Then we load up the airbrush with our custom-mixed pearl color. - Were going to share our secret here for a great "pearl-effect" paint. Using Pearl-Ex Irridescent powdered pigment # 670 Interference Red, and Liquitex acrylic Clear Gloss Medium. About a level teaspoonfull of the powder to an ounce or two of the gloss medium is fine. Thin mixture with water and it sprays like a dream. The metallic particles rise to the surface as the paint settles and it looks almost holographic...that is, colors shift and refract differently as you walk around it Of course, since camera photos (like below) don't move, it's hard to see that effect here. But trust us, it's very special and magical, perfect for this kit's "fairy-tale" theme.
 |
 |
 |
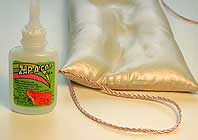
A yard of shiney satiny cord comes with the kit. You can use it or not.. either way is good. It's a nice finishing touch, but has the consequence of shifting her loin cloth ever so slightly in her lap which is slightly annoying. To attach it, just put a tiny drip of glue (shown) evey half inch or so. Start at a corner and work your way around. Ten, fifteen minutes tops. It's that simple.
![]() Glass Case Assembly
Glass Case Assembly
This isn't really as scary as it seems. The box kind of squares
"itself" up as the glass is attached. Still, a little
caution is helpful. First, make a nice, clean, flat, level work
surface. Get out the biggest sheet of glass. Find 2 plastic rails,
pre-cut to the length of the 2 long glass sides. Draw a bead of
Super glue down the inside angle of one of the rails and press
the glass sheet into that. Make sure the glass actually touches
the inside rail corner for the full length... don't leave a space.
Hold until set. Now, glue the other pre-cut rail to the other
long side of the glass sheet.
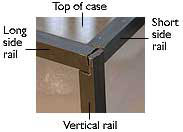
Turn over the big sheet of glass (with your long-side rails now attached). Cut two more short lengths of rails to fit into the allotted space for these 2 sides. (Reference the top surface of photo below). Once cut to length, flip the glass back over to glue these shorter rails in, just like you did the first two.
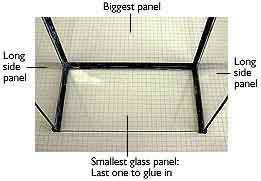
Now, the big Top piece of glass has railings on all 4 sides. Next, we'll attach the longer, slim Side panels. "Squareness" here is important. The Side panels of glass must be glued to the rail at a fairly precise right angle. For that we laid down a sheet of grid paper on our tabletop (a small plastic right triangle would work also). Place your big, assembled piece of glass onto this grid paper, up on end, the tallest part sticking up. With the assembled panel in this position, test-fit a long side panel, making sure with the grid paper, that it is at a right angle to the assembly. Once you are sure of a correct angle, cyanoacrylite glue in the glass. Note: Make sure the glass edge of this piece actually butts up against the glass of the other. That increases strength. Hold firm till set. Now, just repeat the process for the other LONG side panel.
Now, the piece will stand on end on it's own. Also, we now have something to attach the short side rails to. There will be a little "custom-notching" necessary on these rails (reference the previous close-up box-corner pic above this picture). It's not necessary to be super-tidy about this notching, since it gets covered by the corner decorations, but bear in mind, it will be seen from the "inside" of the box...so don't be a total pig about it.
After the short rails are on, we can then glue in the final, Short, side panels. Since you've made certain everything to this point has been assembled square, these little panels should slide in nicely. As always, dry test-fit first. Then put a bead of glue down all three sides and lay the panel in. Hold till set, a minute or two. What you'll immediately notice after these two final panels are in is the the box feels really strong. That's what we want, right?
![]() Glass Case Painting
Glass Case Painting
This part's a snap. Just find some quick-dry metallic gold
paint and brush it onto the 6 box decoration parts, and "Sleeping
Beauty" name plate (all pre-primed of course), and onto the
8 box railings (it's not necessary to prime these as they are
not resin). Let the gold paint dry good. Then, scrape the paint
OFF of the INSIDE of the 4 corner decorations and the inside of
the 2 middle decorations. And also on the outside corners of your
box rails (look closely at the picture below. See the darker areas?...that's
scraped-away paint). Once that's done, glue on the 4 corner decorations,
one at a time. On each, hold down the "tip ends" of
each decorative piece to get a good bond. For center decorations,
MEASURE FIRST to locate center location (don't trust your eyes).
Then, glue those down as well.

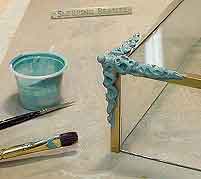
Your glass case is now ready for finishing touches. This may seem weird, but it works great... it's a nice "antique" detail for the glass case decorations. To achieve it, mix up a bright blue-green turquoise color, and paint over the 6 gold decorative elements and the "Sleeping Beauty" type on her name plate. (I know, weird...but this is the color copper turns after a long time.) Let that dry, and then dry-brush gold to just the upper surfaces, leaving the turquoise in the depressions. It looks great.
![]() Painting the Stone Base
Painting the Stone Base
We really have saved the most fun for last here. First, important....put
everything else you've painted in another room, because this can
be messy.
Lay out some newspaper, sticking out at least a foot all around your stone base. Spray the base a light tannish-grey, all over. Then line the gridded crevices with a darker grey stone color. While tht's drying, mix up 3 colors, a steel blue, the "flesh" of Beauty's skin color, and a brown grey.(see pic below).
Dip an old toothbrush into one of the colors. "Test-flick" it first onto a scrap of cardboard or paper, to get the big drops off, then flick the brush with your finger to spatter all over the surface of the stone. Then do the next color, and the next. The bright colors will visually blend into a muted color, it's an old theatrical set-painting technique. If it seems you've gone too far, don't fret. Just mist back the whole base, with an airbrush and your original color. Seal with Dull Cote.
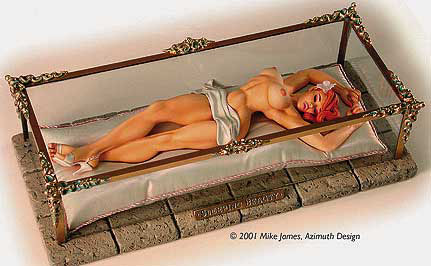
Well, can you believe it? Here they are,.. all your parts....painted. Go ahead...put them together. The textures work fabulously off one another...rough stone, hologaphic metallic, velvety peach skin, glassy box...put together it's absolutely gorgeous! We hope you enjoyed building this kit, and we know you will get much pride in displaying this "Beauty" to your friends. This kit is a real work of art. Mike's very proud of it.
We have had a lot of illegal knock-offs of our
kits sold in foreign countries.
Remember, Azimuth Design only sells directly to
the customer, not in stores. If your kit does not include
the Certificate of Authenticity below, with the
Raised Seal and personally-inked signature
of Mike James,
you do not own a Mike James original piece of art.
It takes a lot of time, skill and money to bring you these precious
girls. Please support creators, not thieves.
Contact us if you suspect illegal activity, or if you see a Mike
James kit or image being used for profit.
arthouse@ptd.net
Copyright © 1995-2001 Mike James, Azimuth Design.
The Beauty character, likenesses thereof, storyline and all related materials are copyrighted
and registered intellectual property of Azimuth Design. All rights reserved, in any media.
Copyright © 1994-2001 Firefly Design.