|
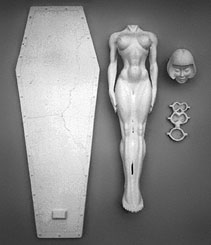 |
Cleaning the Parts
First, bathe all parts well. This is an important step, there is mold release on the surface that you cannot see. It will prevent any paint from sticking to the resin. We recommend rubbing alcohol, lacquer thinner, or just plain old warm (not hot) soapy water. Lemon-scented dish detergent works good. Now, grind down any remaining casting sprues on body. Cut apart the shackles if you choose to use them. There is one for the neck, one for the ankles, and two small ones for the wrists. Grind seams and putty any pinholes you find. (On some kits you may notice some light blue spots. This is where we did some prep work for you, and puttied some of the more visible castingup.
Assembly
The only seams that should require grinding are between the arms and the torso. Use a Dremel Moto Tool, or files. Tiny files, or small-tool fittings for the Dremel, can be used to separate small gaps between the torso and wrists as well. We think other important places to file out are a little triangle below the crotch, a long, thin gap between the knees and another between the ankles.
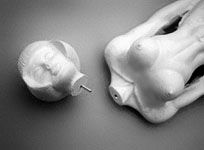
Attaching the head:
We recommend pinning the parts for strength. Use a finishing nail
or a cut section of a large paper clip. Drill out receiving holes
in the neck-flats of both the head part and the body part. Insert
the pin into the head part with some glue (cyanoacrylite, i.e.
Super or Crazy Glue). Test fit. Then drip some glue into the body's
neck-hole and a tiny bit around the neck flats (not too much,
you don't want it squishing out). Line up carefully and hold together
until set. Her head should face directly front. There is a crevice
on the back of her neck. Make sure that lines up too. That's it!
Assembly on the figure is done! Wow, that was easy, huh? Save
attaching the shackles (if used) until after kit is painted.
Priming
As with all resin kits, this kit must be PRIMED before painting.
Any light-grey sandable spray primer will do. We recommend NAPA's
(available at NAPA Auto Parts Store) Light Grey Primer #7865.
One coat is fine, just enough to cover, no more, or detail may
be lost.
Painting
Mixing and Painting Flesh
It's always a good idea to paint flesh colors in daylight. It
becomes a MUST when your kit is exposing as much flesh as Arora.
We suggest setting up a table at a big, bright window. There are
many pre-mix "flesh" colors out there but we recommend
making your own flesh. For caucasion flesh, lots of white, smaller
and equal amounts of pink and brown. To this, add some drops of
straight orange, and a couple of yellow. This renders a knockout
"peachy" color that brims with life, very fresh and
ingenue. If it looks too harsh, add white and a drop of lime green.
Never, ever, darken a light color with black. If you want darker
flesh darken with brown. We recommend airbrushing skin tones.
Base-coating Flesh
To start, take your custom flesh color and airbrush all flesh
areas solidly. Several light coats are always better than two
heavy coats. Here is a little tip for the final base coat, we
dip a Q-tip, or sometimes even our finger, into the color and
"rub in" the last coat. What happens is that, as you
rub, the paint becomes a thick slurry that is deposited into crevices
and micro pinholes, while simultaneously sanding the grainy top
surface. The finish surface is almost glassy smooth, a perfect
surface for detailing!
For toning, make a slightly darker, orangy version of your color,
and also a lighter version (double the white). Lightly mist the
muscle crevices with the darker version, and lightly mist the
crowns of the muscles with the lighter version. If you go too
far and there is too much contrast, no problem, just evenly mist
the original flesh color back over all the flesh. Finally, we
mist a darker, orangy/rose tonation to the apples of her cheeks
and buttocks to give them a flushed look. We mix a slightly yellow-er,
creamy-white color and spay the globes of her breasts. Check your
colors in sunlight outdoors.
You may wish to modify the original base color
and mist her all over to soften further. Once
satisfied, spray the figure with two light coats of
Testor's Dull Cote to seal and protect.
Painting the Face
Eyes: Airbrush a darker flesh color around the outside her
eyelashes, wider on the outside corners, tighter on the inside
corners. (See color reference pics.) Go back and use the original
flesh base color on the eyelids. This will make it look like her
eyelids are catching light from above. Brush on straight black
to the front surfaces only of the eyelashes. With black still
on your brush, fill in the drilled holes of her pupils.Then paint
the whole surface of the actual eyeball white (except the black
pupil). Decide on an eye color. Paint a very light version of
it for the iris. Notice that just the lower one-third crescent
of her iris will show as her eyes are
half-closed.
Lips: Mix up a small batch of pretty deep rose. (For extra
succulence we add a few drops of florescent pink). Give her lips
(and fingernails) a covering coat or two of this color. Now, pour
out a few drops onto a plate and add a drop or two of red to darken.
Brush in teeny little lines to the lip crevices. Lighten the original
color and round up her lower lip with a soft highlight. A nice
light orangy brown is good for her eyebrows. Also use this color
to dot the insides of her nostrils. A little rosey blush airbrushed
to the apples of the cheeks is good. Once satisfied with the face,
seal with Dull Cote. Once the dull coat is fully dry, you can
put a ultra-glossy clear-coat on just the lips and eyeballs. This
kicker gives her a wet dreamy look.
Painting the Hair
First, we simply painted her hair solidly with the base flesh
color whether caucasion or black. Once that's dry, make a wash
(watered-down paint) of a darker version of the color and flood
it over the hair, so that it gathers in the crevices. Let the
wash drain by holding it upside down, twisting this way and that,
trying not to get the runny paint on her face. You can add a second
or third wash if you want it darker. Once satisfied with hair,
seal with Testors Dull Cote.
Painting the Stone Slab
Compared to the fussy techniques used for the figure, painting
the base is a load of fun. First, lay the figure aside, cuz this
can get messy. With acrylics, mix up a light warm grey stone color
and coat the whole (already-primed) base, top, bottom, sides.
Once dry, mix darker version of this stone color, a brownish gray,
and using a big half-inch brush flood this over the surface and
let it seep into the depressions. Let dry. You can do extra coats
and/or extra colors. Then, using a very light sandpaper (like
220 grit or finer) very lightly brush over the top surface of
the base to bring back the original lighter color stone on the
higher surfaces. Use metallic paint on the little edge rivets.
______________
| Mounting the figure to the
base We think loose-pinning is a good idea, plus it does not disrupt the kit that much. We want to place a pin in the stone base that fits a tiny hole in the back of her head. Place the figure in position on the base with the soles of her feet against the foot-stand. Make sure her head is exactly centered, side-to-side. Holding her firmly in place. Look down from the top of her head and make a pencil mark on the back of the base where it appears her head touches the base. Then, check from the side and make another mark of where it appears her head hits the base. The intersection of these two marks tells you where to place the drill bit. |
|
You are still holding the figure tightly to the base. Using a small drill bit (that is only a teeny bit larger than your selected pin) drill from the back of the base straight into her skull. Not too deep, a quarter inch is fine. Now, still holding the figure to the base, push your pin (a nail or paperclip) into the hole, all the way into the head as far as it will go. Make a mark on the pin where it exits the base and remove the pin. Now you can separate the figure from the base. Clip the pin off a bit shorter than the mark you made. Lay the base flat on the table, put some glue on the pin and push it into the base hole all the way to the table-top. This way the amount sticking out should be exactly the right length for the hole in the back of her head.
Optional characters:
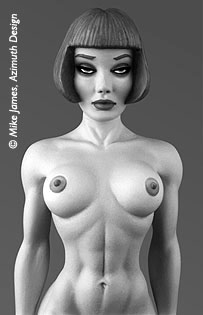
Arora was intentionally produced as a "generic" figurine,
onto which modelers could project any character. Below are short
descriptions of how Mike James built 4 of his own versions.
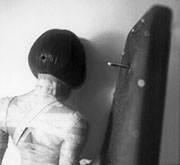
For his "Cleopatrix" mummy version, he first painted her nude, as a dark-skinned Egyptian girl. For the wrapping, he simply cut a bunch of 3/16ths inch wide strips of regular old masking tape. The little peek-a-boo patches of her flesh exposed help make her seductive. Then he tinted the tape with a wash of medium grey. Approprite blue eye makeup brings home the exotic effect.
For his "Frankenstina" version, he used a deathlike, pale lavender-grey skin coloration. He utilized the optional shackles, pinning her to the optional stone slab base with #4 finishing nails. He added LEDs and a little electric sound device (both cannibalized from a $4 StarWars toy gun!). The replacement heart stitching was simply painted on. She lives!
For his standing "Super Vixen" (a sort of scary super-girl), he first fashioned boots with auto body putty using finishing nails for the heels. He simply ground some little indention lines to mark the boot and glove seams. He cut little rubber strips for the belts and used a tiny bent paperclip for the buckle. He utilized the optional cape part, added a couple of scavenged jewels and a tiny chain to finish off the cape detailing.
For his "Cyborg Arora" he first ground and sanded off all her hair to a pleasant skull-shape. Then, scavenging his parts drawers, he test-fit and glued on various gears, buttons, hoses, and any other do-dad that he thought looked cool. Mike cast the top of a outdoor floodlight bulb for the domed base. He pinned her oto the base and simply sprayed her silver. (Note: Patience...allow solvent-based silver paint at least a week or two to dry in a warmed cabinet before touching!)
These are by no means your only build-up options. Use your own imagination. You'll find you can project almost any character you desire onto this wonderfully adaptive nude framework.
Azimuth Design
P. O. Box 157
Equinunk, PA 18417
tel: 570.224.4081
email: arthouse@ptd.net
web: www.jamesart.com
Copyright © 1999  Mike James, Azimuth Design.
The Arora character, likenesses thereof, storyline and all related materials are copyrighted
and registered intellectual property of Azimuth Design. All rights reserved, in any media.
Copyright © 1994-1997 Firefly Design.